

در این آموزش، نحوه استفاده از MultiView در ASP.NET را به شما نشان خواهم داد. با استفاده از سی شارپ، و ما مثال ساده ای از همان اطلاعات دانشجویی را که در کنترل Wizard خود استفاده کرده ایم، می گیریم و همان طرحی خواهد بود که در اینجا ادغام خواهیم کرد.
محفظه اولیه
مرحله 1
Visual Studio 2010 خود را باز کنید و یک وب سایت خالی ایجاد کنید و یک نام مناسب [view_demo] بگذارید.
مرحله 2
در Solution Explorer، وب سایت خالی خود را دریافت می کنید، یک فرم وب اضافه می کنید.
برای فرم وب
view_demo (وب سایت خالی شما) -> کلیک راست کنید -> افزودن آیتم جدید -> فرم وب. آن را به عنوان ->view_demo.aspx نامگذاری کنید.
اتاق طراحی
مرحله 3
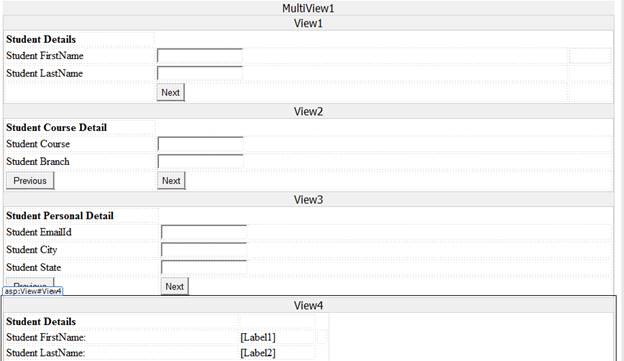
view_demo.aspx خود را باز کنید، کنترل Multiview را از جعبه ابزار بکشید و رها کنید. در Multiview خود، سه نما را به عنوان - جزئیات دانشجو، جزئیات دوره دانشجویی، جزئیات شخصی دانشجو و خلاصه دانشجو اضافه کنید. فایل .aspx خود را مطابق شکل زیر طراحی کنید.
- <%@ Page Language="C#" AutoEventWireup="true" CodeFile="Multiview.aspx.cs" Inherits="Multiview" %>
- <!DOCTYPE html>
- <html xmlns="http://www.w3.org/1999/xhtml">
- <head runat="server">
- <title></title>
- <style type="text/css">
- .auto-style1 {
- width: 478px;
- }
- .auto-style2 {
- width: 224px;
- }
- .auto-style3 {
- width: 219px;
- }
- .auto-style4 {
- width: 218px;
- }
- </style>
- </head>
- <body>
- <form id="form1" runat="server">
- <div>
- <asp:MultiView ID="MultiView1" runat="server">
- <asp:View ID="View1" runat="server">
- <table style="width: 100%;">
- <tr>
- <td class="auto-style4"><strong>Student Details</strong></td>
- </tr>
- <tr>
- <td class="auto-style4">Student FirstName</td>
- <td>
- <asp:TextBox ID="TextBox1" runat="server"></asp:TextBox></td>
- <td></td>
- </tr>
- <tr>
- <td class="auto-style4">Student LastName</td>
- <td>
- <asp:TextBox ID="TextBox2" runat="server"></asp:TextBox></td>
- <td> </td>
- </tr>
- <tr>
- <td class="auto-style4"> </td>
- <td>
- <asp:Button ID="Button2" runat="server" OnClick="Button2_Click" Text="Next" />
- </td>
- <td> </td>
- </tr>
- </table>
- </asp:View>
- <asp:View ID="View2" runat="server">
- <table style="width: 100%;">
- <tr>
- <td class="auto-style3"><strong>Student Course Detail</strong></td>
- </tr>
- <tr>
- <td class="auto-style3">Student Course</td>
- <td>
- <asp:TextBox ID="TextBox3" runat="server"></asp:TextBox></td>
- </tr>
- <tr>
- <td class="auto-style3">Student Branch</td>
- <td>
- <asp:TextBox ID="TextBox4" runat="server"></asp:TextBox></td>
- </tr>
- <tr>
- <td class="auto-style3">
- <asp:Button ID="Button3" runat="server" Text="Previous" OnClick="Button3_Click" />
- </td>
- <td>
- <asp:Button ID="Button4" runat="server" Text="Next" OnClick="Button4_Click" />
- </td>
- </tr>
- </table>
- </asp:View>
- <asp:View ID="View3" runat="server">
- <table style="width: 100%;">
- <tr>
- <td class="auto-style2"><strong>Student Personal Detail</strong></td>
- </tr>
- <tr>
- <td class="auto-style2">Student EmailId</td>
- <td>
- <asp:TextBox ID="TextBox5" runat="server"></asp:TextBox></td>
- </tr>
- <tr>
- <td class="auto-style2">Student City</td>
- <td>
- <asp:TextBox ID="TextBox6" runat="server"></asp:TextBox></td>
- </tr>
- <tr>
- <td class="auto-style2">Student State</td>
- <td>
- <asp:TextBox ID="TextBox7" runat="server"></asp:TextBox></td>
- </tr>
- <tr>
- <td class="auto-style2">
- <asp:Button ID="Button5" runat="server" Text="Previous" OnClick="Button5_Click" />
- </td>
- <td>
- <asp:Button ID="Button6" runat="server" Text="Next" OnClick="Button6_Click" style="height: 26px" />
- </td>
- </tr>
- </table>
- </asp:View>
- <asp:View ID="View4" runat="server">
- <table class="auto-style1">
- <tr>
- <td><strong>Student Details</strong></td>
- <td> </td>
- </tr>
- <tr>
- <td>Student FirstName:</td>
- <td>
- <asp:Label ID="Label1" runat="server" Text=""></asp:Label>
- </td>
- <td> </td>
- </tr>
- <tr>
- <td>Student LastName:</td>
- <td>
- <asp:Label ID="Label2" runat="server" Text=""></asp:Label>
- </td>
- </tr>
- <tr>
- <td></td>
- <td> </td>
- </tr>
- <tr>
- <td><strong>Student Course Details</strong></td>
- <td> </td>
- </tr>
- <tr>
- <td>Student Course:</td>
- <td>
- <asp:Label ID="Label3" runat="server" Text=""></asp:Label>
- </td>
- </tr>
- <tr>
- <td>Student Branch:</td>
- <td>
- <asp:Label ID="Label4" runat="server" Text=""></asp:Label>
- </td>
- </tr>
- <tr>
- <td> </td>
- <td> </td>
- </tr>
- <tr>
- <td><strong>Student Personal Details</strong></td>
- <td> </td>
- </tr>
- <tr>
- <td>Student EmailId:</td>
- <td>
- <asp:Label ID="Label5" runat="server" Text=""></asp:Label>
- </td>
- </tr>
- <tr>
- <td>Student City:</td>
- <td>
- <asp:Label ID="Label6" runat="server" Text=""></asp:Label>
- </td>
- </tr>
- <tr>
- <td>Student State:</td>
- <td>
- <asp:Label ID="Label7" runat="server" Text=""></asp:Label>
- </td>
- </tr>
- </table>
- </asp:View>
- </asp:MultiView>
- </div>
- </form>
- </body>
- </html>
طراحی شما به این شکل خواهد بود،
اتاق کد
مرحله 5
در اینجا، ما برای طراحی خود کد می نویسیم. فرض را بر این گذاشته بودیم که در مرحله اولیه پس از وارد کردن مشخصات دانشجو، روی دکمه بعدی. دانشجو باید به نمای جزئیات درس دانشجو و روی دکمه بعدی بیاید. دانش آموز باید به Student Persona Detail برود.
در هر View دکمه های Next و Previous را گرفته بودیم تا کاربر بتواند در حین پر کردن فرم به عقب و جلو برود. این حرکت رفت و برگشت را می توان با کمک یکی از ویژگی های Multiview یعنی ActionViewIndex انجام داد.