

معرفی
مقاله امروز ادامه آموزش ماشینی پس از Azure من است: تجزیه و تحلیل پیشگویانه طبقه بندی با استفاده از مجموعه داده Iris . در این پست، من استفاده از مدل یادگیری ماشین Azure را در یک برنامه مشتری نشان خواهم داد. من یک برنامه مبتنی بر وب خواهم ساخت.
کاری که برنامه وب من انجام می دهد این است که از مدل Iris ML که من در استودیوی یادگیری ماشین Azure ایجاد کرده ام استفاده می کند. این برنامه مقادیر ارائه شده را به نوع طبقه بندی شده Iris یعنی Iris-setosa، Iris-versicolor و Iris-virginica آموزش و پیش بینی می کند.
پیش نیازها
قبل از اینکه در این آموزش ادامه دهید، موارد زیر چند پیش نیاز است.
- دانش مقاله من یادگیری ماشین لاجورد: تجزیه و تحلیل پیشگویانه طبقه بندی با استفاده از مجموعه داده عنبیه .
- دانش مجموعه داده Iris.
- درک اولیه مفاهیم یادگیری ماشین.
- آشنایی با ASP.NET MVC5
- دانش HTML.
- آشنایی با جاوا اسکریپت.
- آشنایی با بوت استرپ
- آشنایی با جی کوئری
- دانش برنامه نویسی سی شارپ .
می توانید سورس کد کامل این آموزش را دانلود کنید یا می توانید بحث گام به گام زیر را دنبال کنید. کد نمونه در Microsoft Visual Studio 2015 Enterprise در حال توسعه است.
بیایید اکنون شروع کنیم.
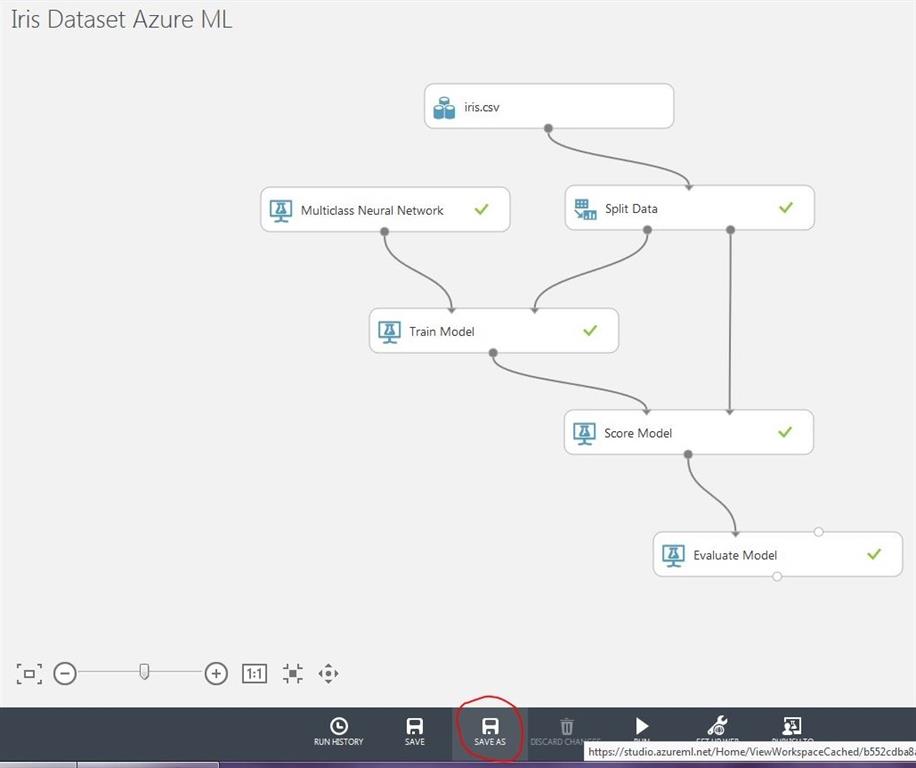
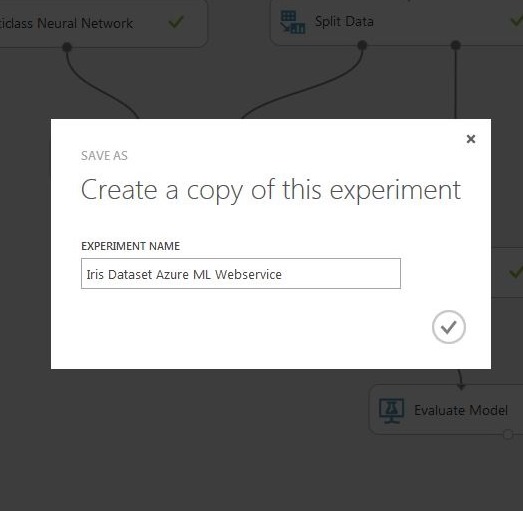
ابتدا باید مدل Azure ML خود را به وب سرویس تبدیل کنیم. اگر قبلاً مدل یادگیری ماشین عنبیه را در استودیوی Azure ML ایجاد نکردهاید، میتوانید مقاله من را دنبال کنید یادگیری ماشینی Azure: Classification Predictive Analysis using Iris Dataset در غیر این صورت استودیوی یادگیری ماشین خود را باز کنید و روی مدل یادگیری ماشین مجموعه داده Iris کلیک کنید و یک مدل جدید ایجاد کنید. کپی از آن همانطور که در زیر نشان داده شده است آن را به عنوان "سرویس وب Azure ML مجموعه داده های Iris" نامگذاری کنید.
گام 2
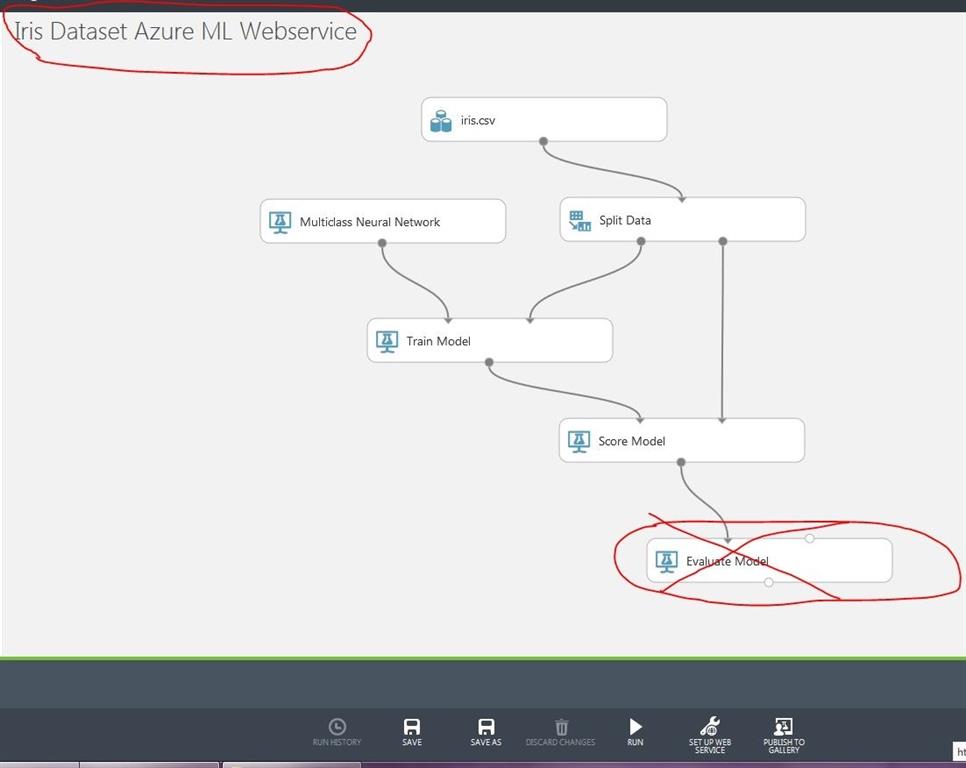
اکنون ماژول "Evaluate Model" را حذف کنید زیرا اکنون در حال ایجاد یک وب سرویس هستیم و باید ماژول ارزیابی را مانند تصویر زیر حذف کنیم.
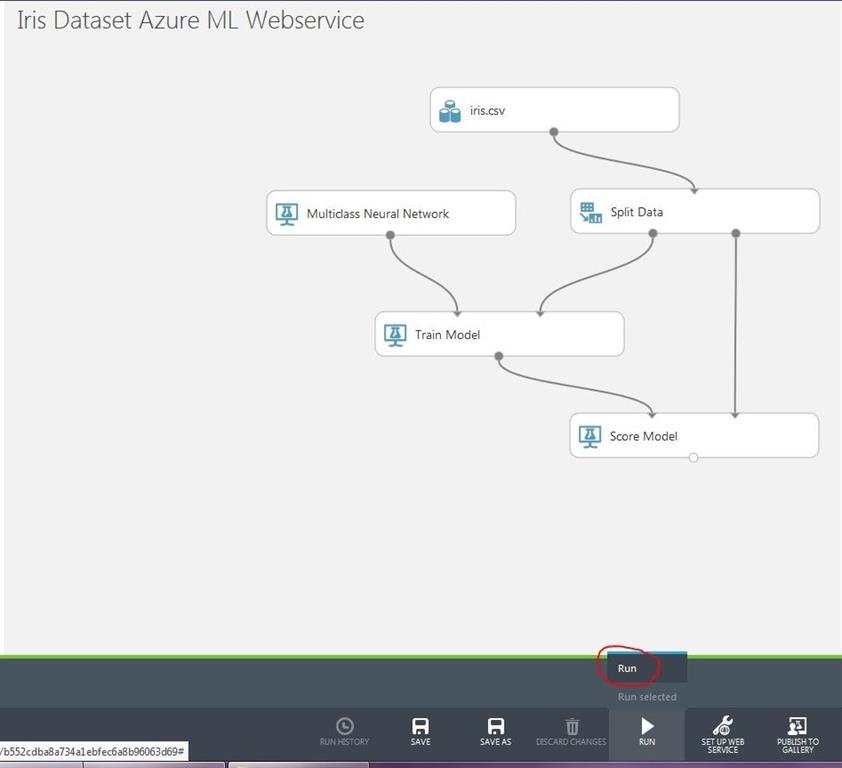
اکنون مطابق شکل زیر روی Run کلیک کنید تا مدل خود را آموزش دهید.
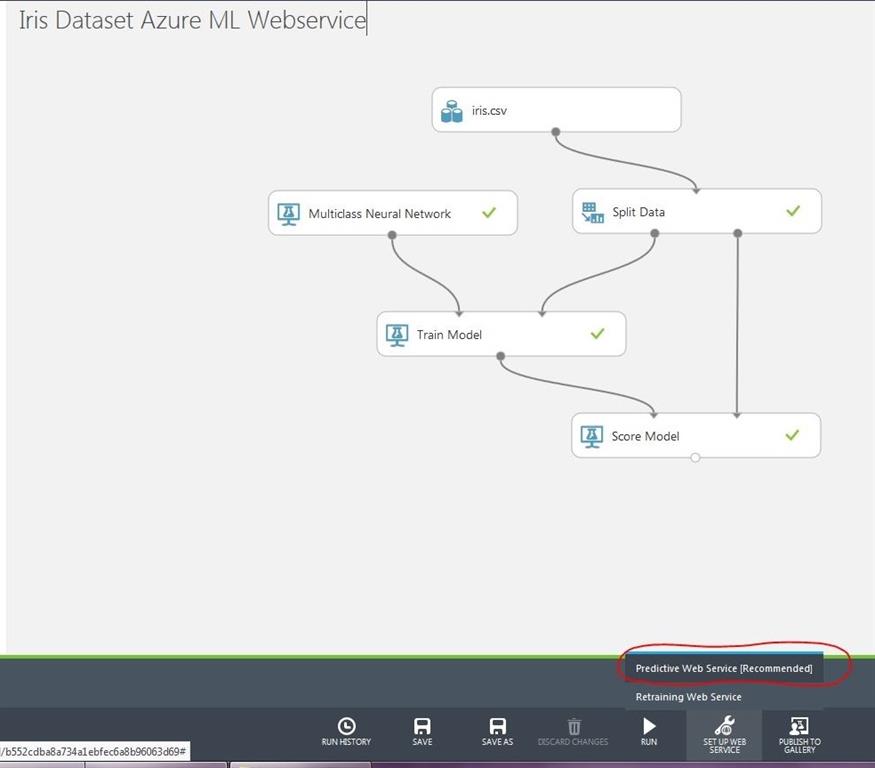
برای ایجاد یک سرویس وب برای مدل یادگیری ماشین، روی «سرویس وب پیشبینیشده [توصیهشده]» کلیک کنید.
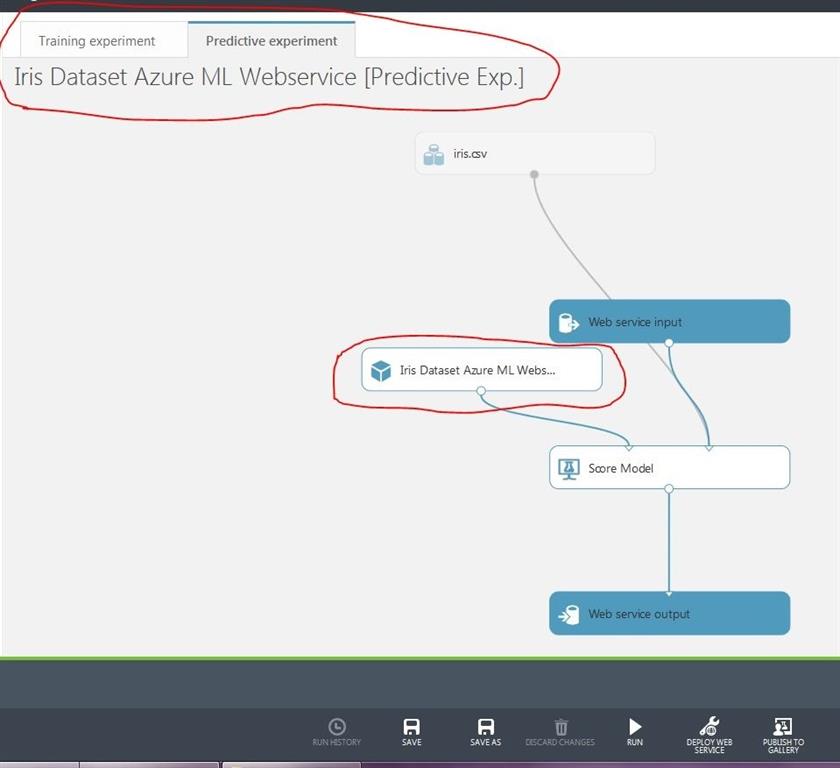
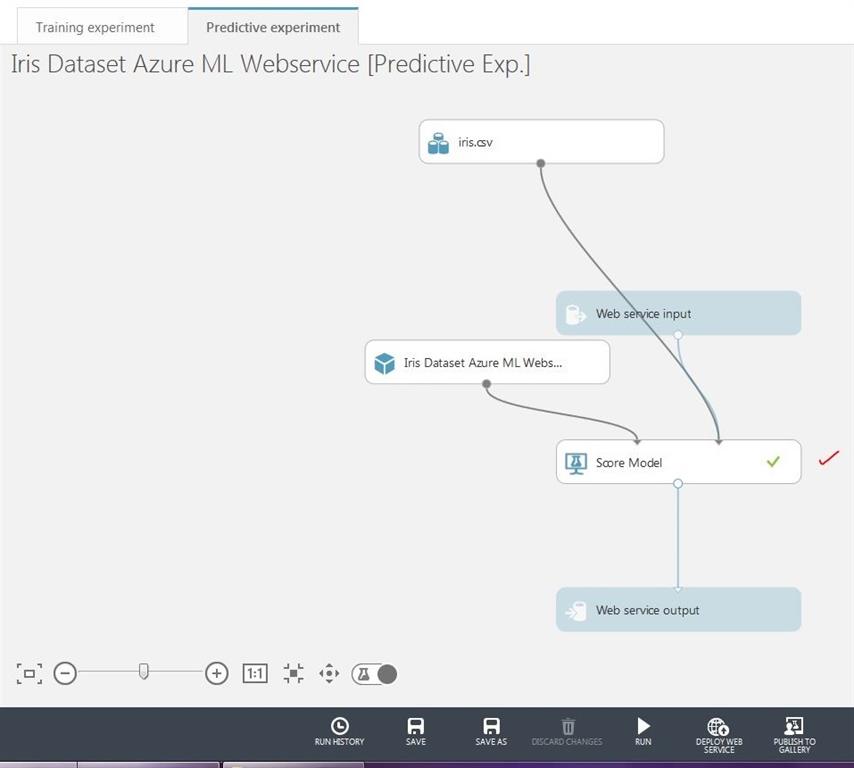
توجه داشته باشید که در قطعه بالا، مدل یادگیری ماشین عنبیه ما به یک ماژول در زیر برگه "آزمایش پیش بینی" تبدیل شده است.
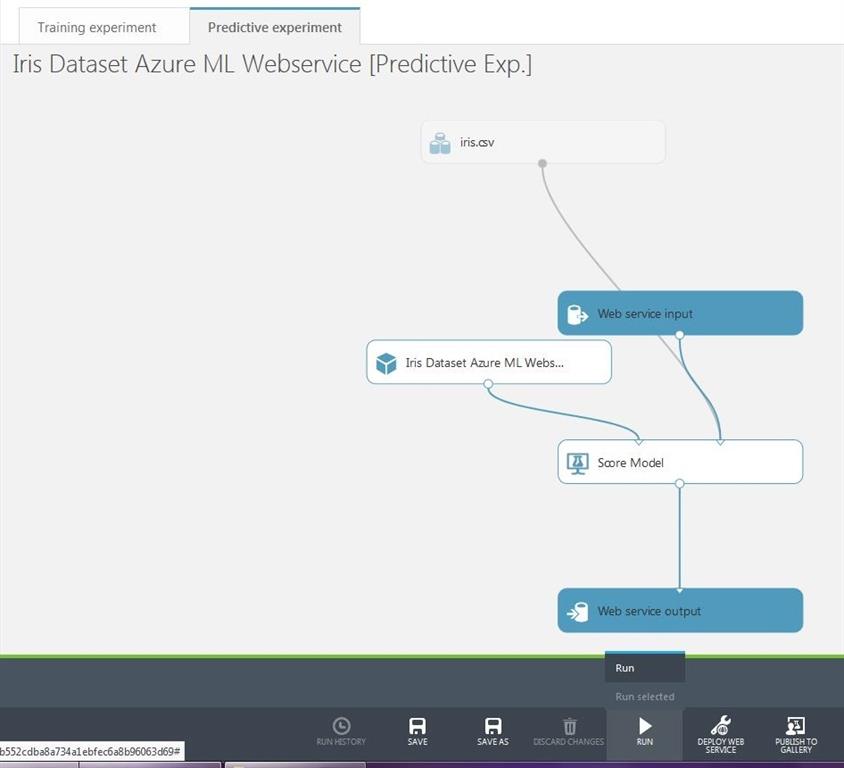
روی دکمه "Run" کلیک کنید تا مدل خود را برای وب سرویس آموزش دهید.
مرحله 6
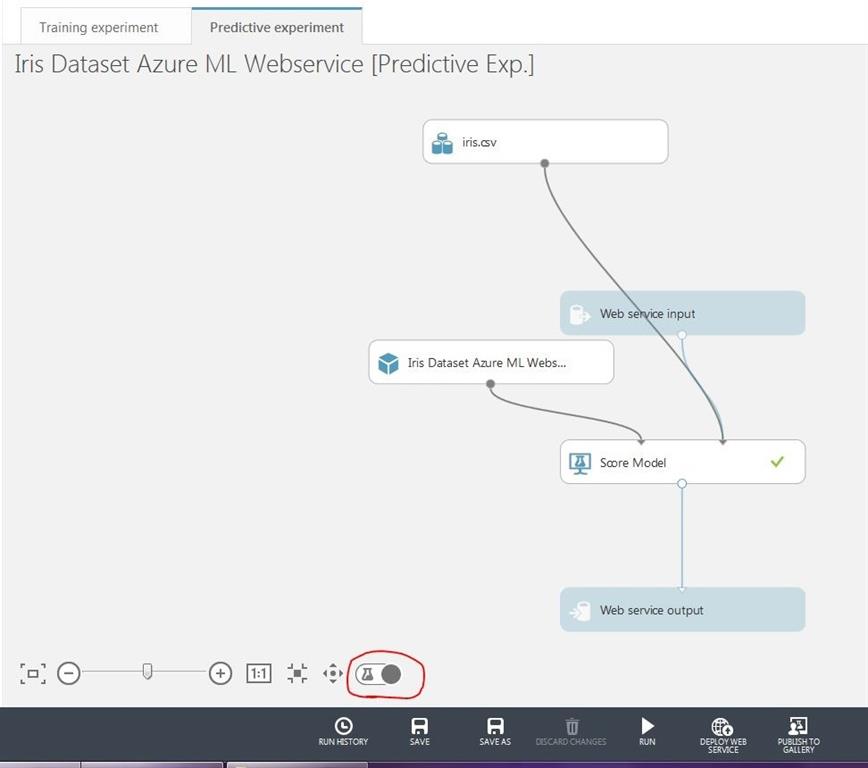
به یک سوئیچ کوچک مطابق شکل زیر در قطعه توجه کنید. این سوئیچ بین مدل اصلی یادگیری ماشین Iris شما و مدل وب سرویس جابجا می شود.
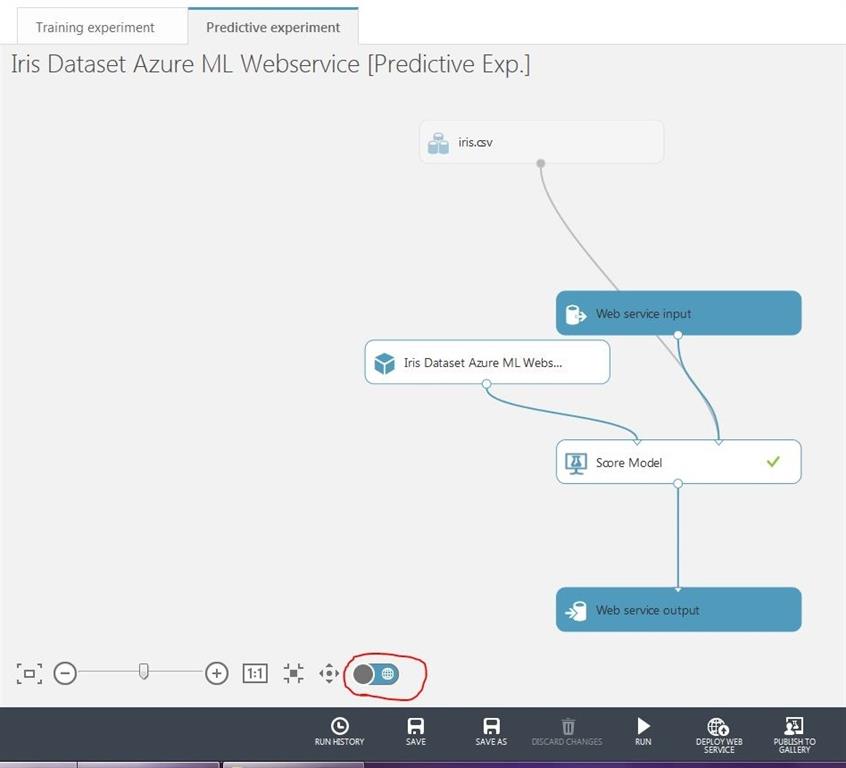
در اینجا توجه کنید که برخی از ماژول ها در آزمایش آموزشی و برخی در آزمایش پیش بینی خاکستری می شوند. این به این دلیل است که ماژول های خاکستری به ما می گویند که از آنها استفاده نمی شود. برای مثال، در صورت آزمایش آموزشی، ماژولهای ورودی سرویس وب و خروجی سرویس وب استفاده نمیشوند در حالی که مدل یادگیری ماشین ما از طریق مجموعه دادهای که ارائه کردهایم ارزیابی میشود و در صورت آزمایش پیشبینی، ماژول مجموعه داده نمونه ما خاکستری میشود، این به این معنی که سرویس وب ما از مجموعه داده نمونه ما استفاده نمی کند، ما باید مدل خود را با مقادیر زنده از طریق برنامه مشتری آموزش دهیم.
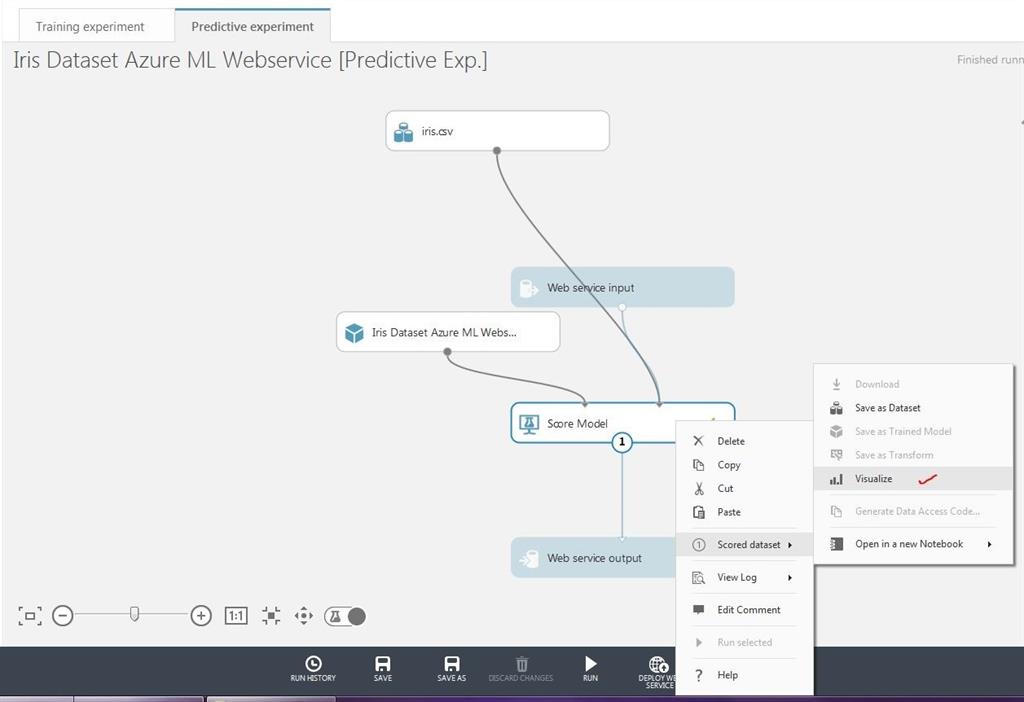
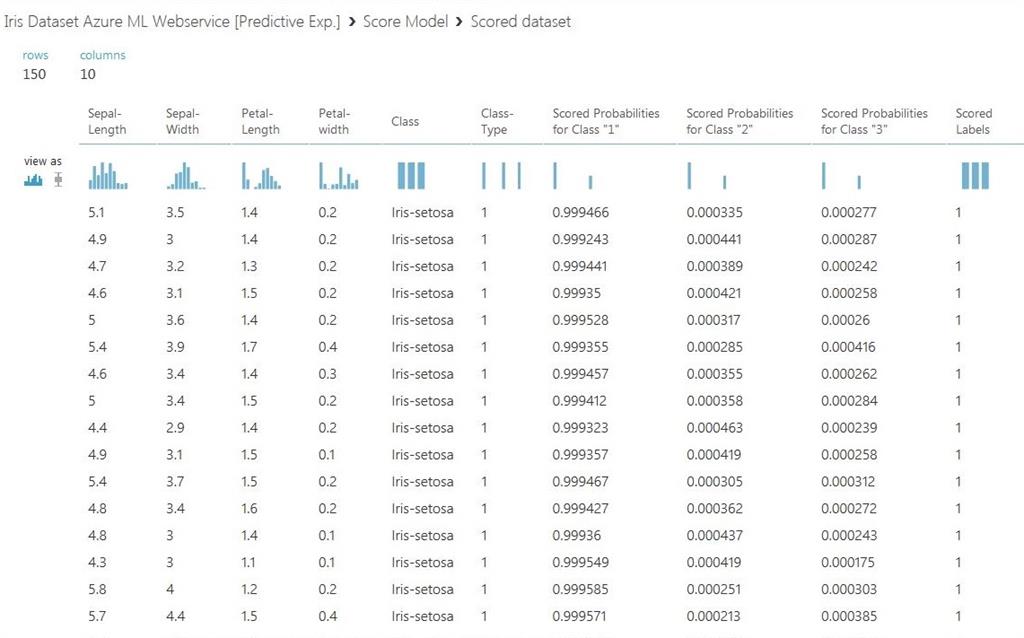
اکنون، روی ماژول "Score Model" در زیر آزمایش آموزشی کلیک راست کرده و روی "Visualize" کلیک کنید. شما نتیجه مدل یادگیری ماشین ما را با توجه به مجموعه داده های نمونه ارائه شده ما خواهید دید.
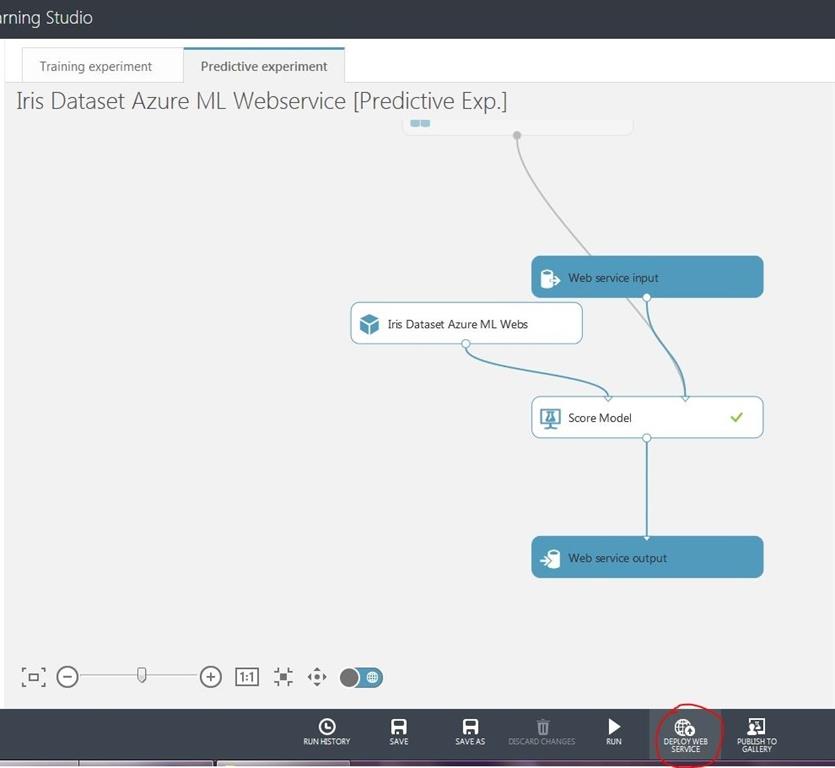
بیایید خدمات وب خود را مستقر کنیم تا بتوانیم آن را در یک برنامه مشتری مصرف کنیم. مطابق شکل زیر روی "Deploy Web Service" کلیک کنید
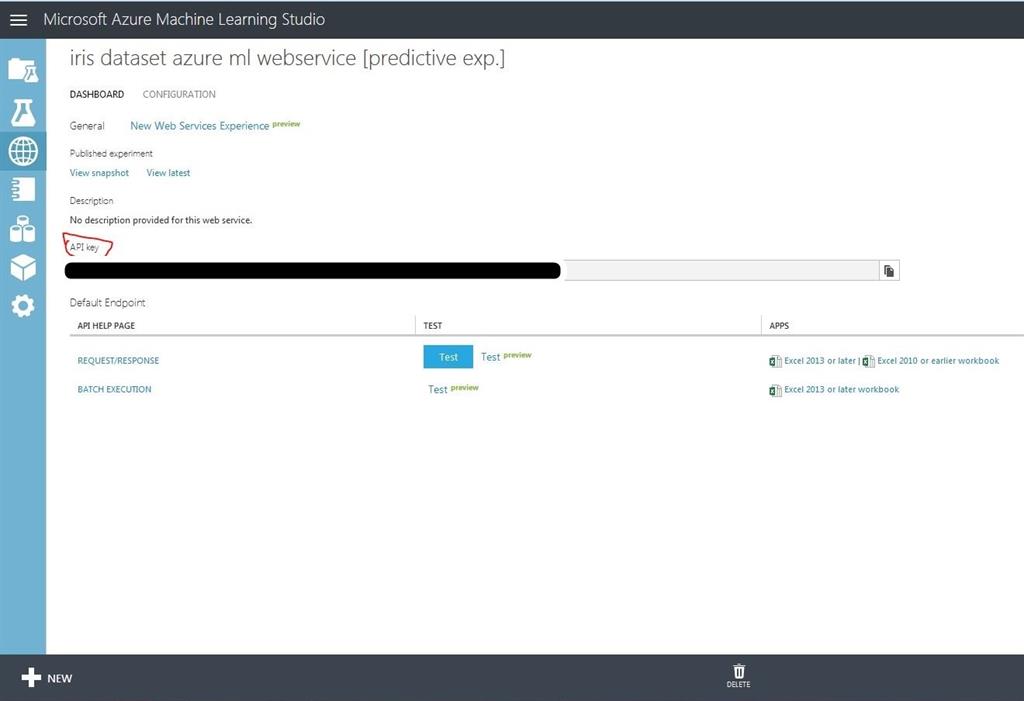

در قطعههای بالا، پس از استقرار وب سرویس، به بخش وب سرویس استودیوی یادگیری ماشین لاجورد هدایت میشوید، در اینجا میتوانید کلید API وب سرویس خود را که میتوانید در برنامه سمت مشتری خود مصرف کنید و یک برگه پیکربندی که در آن میتوانید استفاده کنید. می تواند مقادیر پیش فرض ورودی و خروجی سرویس وب را پیکربندی کند.
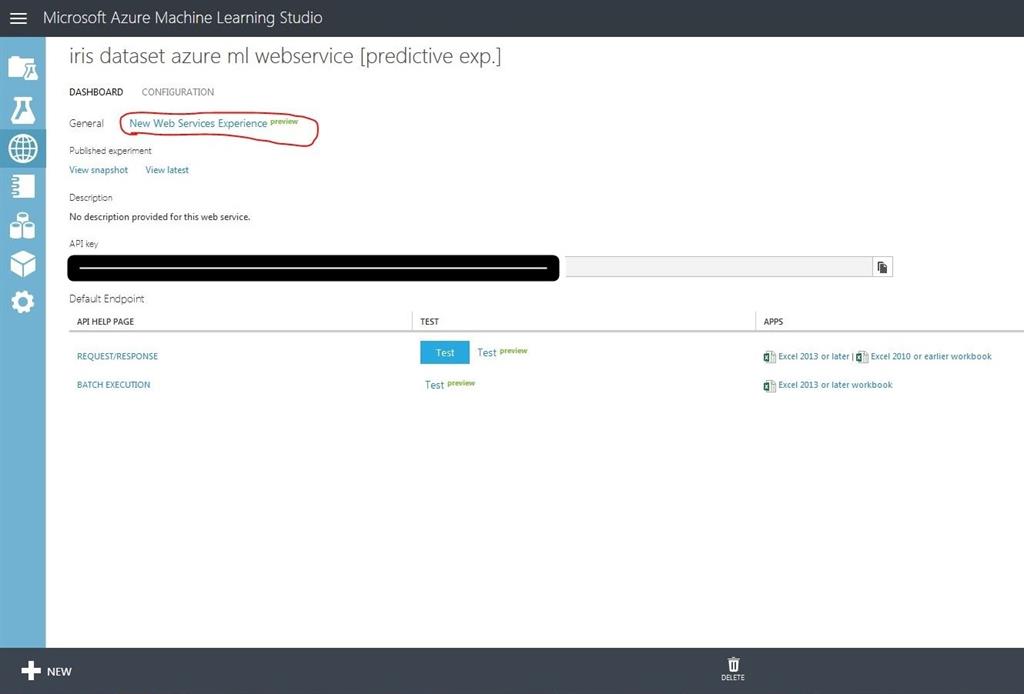
اکنون روی «تجربه خدمات وب جدید» کلیک کرده و مطابق شکل زیر روی «مصرف» کلیک کنید
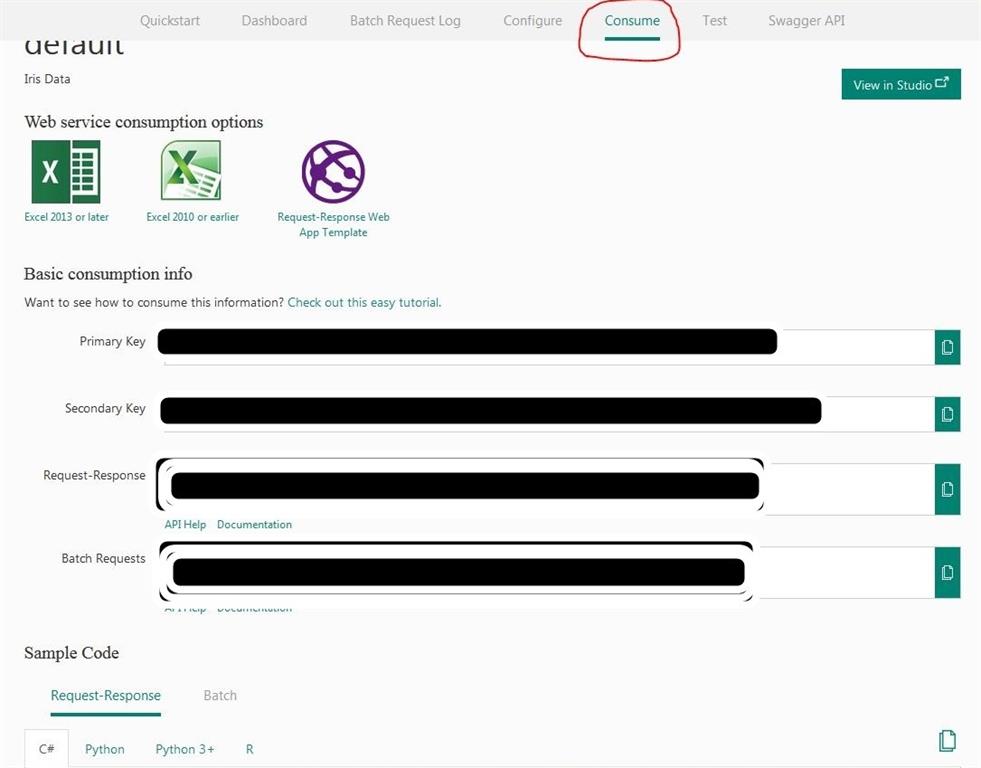
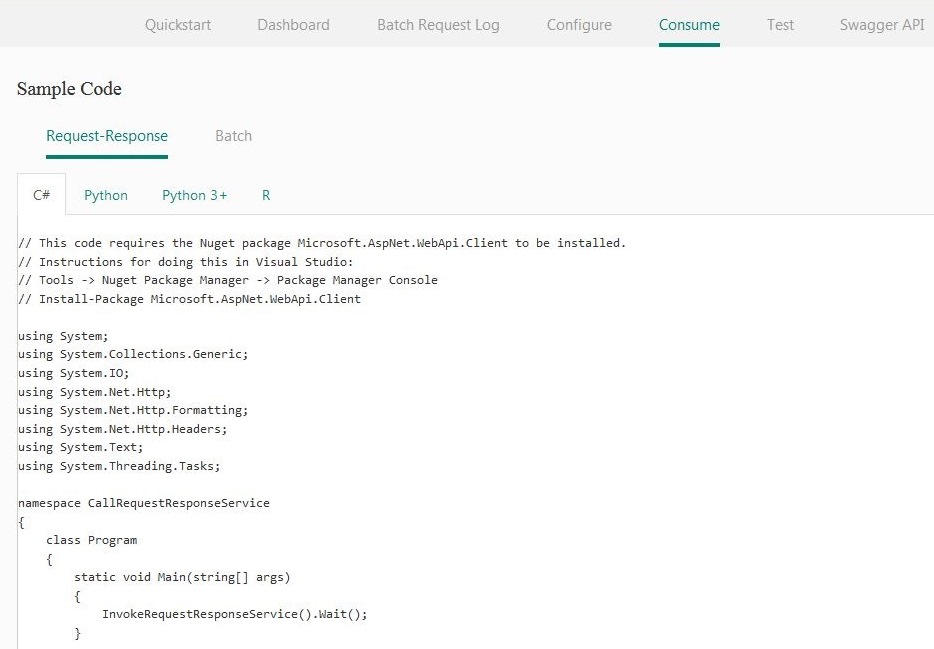
در قطعه های بالا، انواع مختلفی از کلیدهای API و کدهایی که در برنامه مشتری هدف مصرف می شوند را مشاهده خواهید کرد.
فایل "Views\Shared\_Layout.cshtml" را با کد زیر جایگزین کنید
- <!DOCTYPE html>
- <html>
- <head>
- <meta charset="utf-8" />
- <meta name="viewport" content="width=device-width, initial-scale=1.0">
- <title>@ViewBag.Title</title>
- @Styles.Render("~/Content/css")
- @Scripts.Render("~/bundles/modernizr")
- <!-- Font Awesome -->
- <link rel="stylesheet" href="https://maxcdn.bootstrapcdn.com/font-awesome/4.4.0/css/font-awesome.min.css" />
- </head>
- <body>
- <div class="navbar navbar-inverse navbar-fixed-top">
- <div class="container">
- <div class="navbar-header">
- <button type="button" class="navbar-toggle" data-toggle="collapse" data-target=".navbar-collapse">
- <span class="icon-bar"></span>
- <span class="icon-bar"></span>
- <span class="icon-bar"></span>
- </button>
- </div>
- </div>
- </div>
- <div class="container body-content">
- @RenderBody()
- <hr />
- <footer>
- <center>
- <p><strong>Copyright © @DateTime.Now.Year - <a href="http://www.asmak9.com/">Asma's Blog</a>.</strong> All rights reserved.</p>
- </center>
- </footer>
- </div>
- @Scripts.Render("~/bundles/jquery")
- @Scripts.Render("~/bundles/bootstrap")
- @RenderSection("scripts", required: false)
- </body>
- </html>
در کد بالا به سادگی یک طرح ساده برای اپلیکیشن خود ایجاد کرده ایم.
اکنون، یک کنترلر جدید ایجاد کنید، نام آن را "Home" بگذارید و کد زیر را در "Controllers\HomeController.cs" جایگزین کنید.
- using IrisMLClientApp.Models;
- using Newtonsoft.Json;
- using System;
- using System.Collections.Generic;
- using System.Linq;
- using System.Net.Http;
- using System.Net.Http.Headers;
- using System.Threading.Tasks;
- using System.Web;
- using System.Web.Mvc;
- namespace IrisMLClientApp.Controllers
- {
- public class HomeController : Controller
- {
- #region Train ML
- //
- // GET: /Home/TrainML
- [AllowAnonymous]
- public ActionResult TrainML()
- {
- return View();
- }
- //
- // POST: /Home/TrainML
- [HttpPost]
- [AllowAnonymous]
- [ValidateAntiForgeryToken]
- public async Task<ActionResult> TrainML(IrisMLViewModel model)
- {
- if (ModelState.IsValid)
- {
- // Info.
- IrisMLResponseViewModel obj = await this.RequestMLModel(model);
- }
- // If we got this far, something failed, redisplay form
- return this.RedirectToAction("TrainMLSuccess");
- }
- //
- // GET: /Home/TrainMLSuccess
- [AllowAnonymous]
- public ActionResult TrainMLSuccess()
- {
- return View();
- }
- #endregion
- #region Predict
- //
- // GET: /Home/Predict
- [AllowAnonymous]
- public ActionResult Predict()
- {
- return View();
- }
- //
- // POST: /Home/Predict
- [HttpPost]
- [AllowAnonymous]
- [ValidateAntiForgeryToken]
- public async Task<ActionResult> Predict(IrisMLViewModel model)
- {
- // Initialization.
- IrisMLResponseViewModel obj = new IrisMLResponseViewModel();
- if (ModelState.IsValid)
- {
- // Info.
- obj = await this.RequestMLModel(model);
- }
- // If we got this far, something failed, redisplay form
- return this.RedirectToAction("PredictionResult", obj);
- }
- //
- // GET: /Home/PredictionResult
- [AllowAnonymous]
- public ActionResult PredictionResult(IrisMLResponseViewModel input)
- {
- // Initialization
- PredictionResultViewModel result = new PredictionResultViewModel();
- // Switch
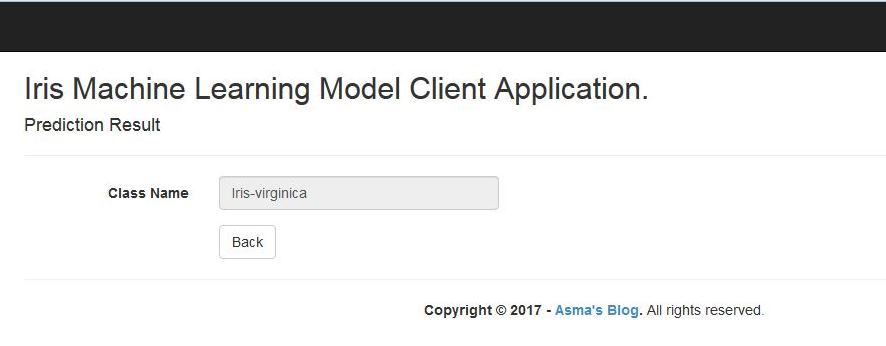
- switch (input.Class_Type_Predicted)
- {
- case "1": result.Class_Name = "Iris-setosa";
- break;
- case "2":
- result.Class_Name = "Iris-versicolor";
- break;
- case "3":
- result.Class_Name = "Iris-virginica";
- break;
- default: result.Class_Name = "Iris-setosa";
- break;
- }
- return View(result);
- }
- #endregion
- #region Helpers
- #region Request ML model method
- public async Task<IrisMLResponseViewModel> RequestMLModel(IrisMLViewModel input)
- {
- // Initialization.
- IrisMLResponseViewModel obj = new IrisMLResponseViewModel();
- try
- {
- using (var client = new HttpClient())
- {
- var scoreRequest = new
- {
- Inputs = new Dictionary<string, List<Dictionary<string, string>>>() {
- {
- "input1",
- new List<Dictionary<string, string>>(){new Dictionary<string, string>(){
- {
- "Sepal-Length", input.Sepal_Length
- },
- {
- "Sepal-Width", input.Sepal_Width
- },
- {
- "Petal-Length", input.Petal_Length
- },
- {
- "Petal-width", input.Petal_Width
- },
- {
- "Class", input.Class_Name
- },
- {
- "Class-Type", input.Class_Type
- },
- }
- }
- },
- },
- GlobalParameters = new Dictionary<string, string>()
- {
- }
- };
- const string apiKey = "your-apikey"; // Replace this with the API key for the web service
- client.DefaultRequestHeaders.Authorization = new AuthenticationHeaderValue("Bearer", apiKey);
- client.BaseAddress = new Uri("your-uri");
- // WARNING: The 'await' statement below can result in a deadlock
- // if you are calling this code from the UI thread of an ASP.Net application.
- // One way to address this would be to call ConfigureAwait(false)
- // so that the execution does not attempt to resume on the original context.
- // For instance, replace code such as:
- // result = await DoSomeTask()
- // with the following:
- // result = await DoSomeTask().ConfigureAwait(false)
- HttpResponseMessage response = await client.PostAsJsonAsync("", scoreRequest).ConfigureAwait(false);
- if (response.IsSuccessStatusCode)
- {
- string result = await response.Content.ReadAsStringAsync();
- string[] data = result.Split(':');
- obj.Class_Type_Predicted = data[12].Split('}')[0].Split('\"')[1];;
- Console.WriteLine("Result: {0}", result);
- }
- else
- {
- Console.WriteLine(string.Format("The request failed with status code: {0}", response.StatusCode));
- // Print the headers - they include the requert ID and the timestamp,
- // which are useful for debugging the failure
- Console.WriteLine(response.Headers.ToString());
- string responseContent = await response.Content.ReadAsStringAsync();
- Console.WriteLine(responseContent);
- }
- }
- }
- catch (Exception ex)
- {
- // Info
- Console.Write(ex);
- }
- // Info.
- return obj;
- }
- #endregion
- #endregion
- }
- }