

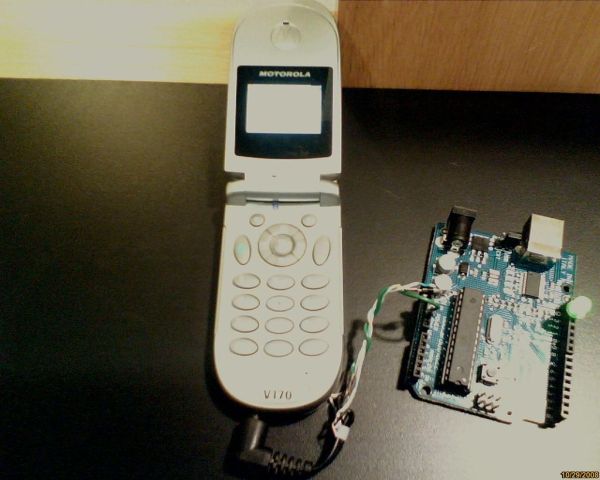
خرید تلفن های همراه قدیمی آسان است و دارای مدار شارژ لیتیومی هستند. چه پایه فوق العاده ای برای منبع تغذیه وسایل کوچک موبایل. من یک تلفن همراه را به آردوینو وصل کردم با قابلیت شارژ تلفن همراه وقتی آردوینو را به پورت usb وصل میکنید. لطفا توجه داشته باشید که این فقط یک دکل سریع بود و از آنجایی که من پیچ گوشتی درستی نداشتم، شامل جدا کردن تلفن همراه نیست. من مطمئن هستم که اگر به پیچ گوشتی صحیح دسترسی داشته باشید، مجبور نخواهید بود کانکتور شارژ تلفن همراه را قطع کنید و فقط می توانید سیم ها را مستقیماً به پایانه های شارژ لحیم کنید. بابت کیفیت تصویری که در بین کلاس های دانشگاه درست کردم متاسفم و بنابراین با وب کم لپ تاپم عکس گرفتم.
شما نیاز دارید:
یک آردوینو،
یک تلفن همراه قدیمی (باید از 5 ولت به عنوان ولتاژ شارژ زگیل دیواری آن استفاده کرد)،
چند باتری تلفن همراه (اختیاری، حداقل یک)
سیم و یک دیود
، شارژر زگیل دیواری تلفن همراه،
یک کانکتور برای اتصال به آردوینو (ii یک سوکت چیپ را برای من از وسط نصف کنید.) حداقل 3 پین.
مرحله 1: اتصال سیم به باتری
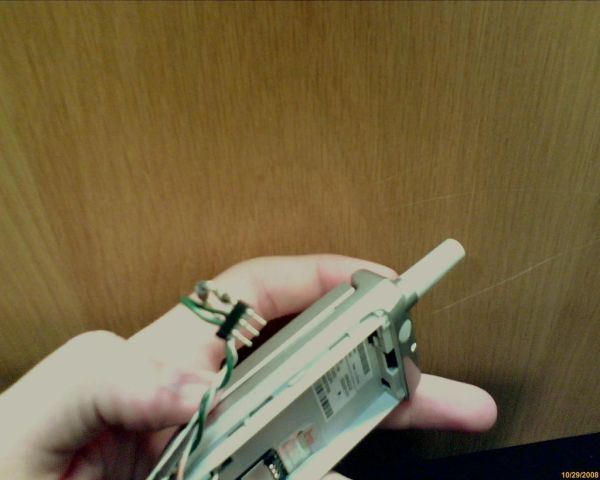
تلفن همراه را باز کنید و باتری را بردارید تا کانکتورهای باتری ظاهر شوند. سیم کارت رو هم برداشتم. باتری را بررسی کنید تا بفهمید چه کانکتورهای ترمینال تلفن همراه به پایانه های مثبت و منفی باتری می روند. سیم ها را به این ترمینال ها لحیم کنید. نگران هیچ ترمینال سومی نباشید، این فقط یک سنسور دما یا چیزی است و برای تلفن همراه است که باید نگران آن باشد.
مرحله 2: تلفن همراه را به آردوینو وصل کنید
سوکت خود را به آردوینو وصل کنید و آن را در ناحیه برق آردوینو قرار دهید تا کانکتورهایی از gnd، 5v و 3v3 داشته باشد. اینها تنها پین هایی هستند که باید به آنها وصل شوید. سیم زمین را از تلفن همراه خود به ترمینال کانکتوری که به gnd می رود لحیم کنید. (اول از آردوینو خارج کنید!!) سپس سیم + باتری را از تلفن همراه به یک دیود و سپس به ترمینال کانکتور که به 3v3 می رود لحیم کنید. روی آردوینو به طوری که نوار دیودها در سمت آردوینو باشد. این دیود از تلاش آردوینو برای شارژ باتری در هنگام وصل شدن آن جلوگیری می کند. اکنون باید یک ترمینال باز روی کانکتور شما بین کانکتورهای متصل وجود داشته باشد که به 5 ولت در آردوینو می رسد. بعداً برای شارژ کردن تلفن همراه به آن نیاز خواهیم داشت. اگر می خواهید، می توانید اینجا توقف کنید و خوب کار می کند. شما فقط با وصل کردن آردوینو نمی توانید تلفن همراه را شارژ کنید، باید آن را با شارژر جداگانه خود شارژ کنید.
مرحله 3: شارژر را وصل کنید
کانکتور را از زگیل دیواری جدا کنید. با وصل کردن زگیل دیواری و استفاده از led برای تست، بررسی کنید که کدام سیم ها مثبت و منفی هستند. برای من سیم با سفید بد مثبت و دیگری منفی بود. سیم های رابط را بردارید. اکنون می توانید سیم منفی را به ترمینال gnd روی کانکتور لحیم کنید یا مقداری عایق را از وسط سیم منفی باتری جدا کرده و به آن لحیم کنید. من انتخاب دوم را انجام دادم. سپس سیم مثبت را به ترمینال خالی کانکتور بین 2 سیم دیگر لحیم کنید. این یکی روی آردوینو 5 ولت می رود.
یک تلفن همراه قدیمی (باید از 5 ولت به عنوان ولتاژ شارژ زگیل دیواری آن استفاده کرد)
چند باتری تلفن همراه (اختیاری، حداقل یک)
سیم و یک دیود
شارژر زگیل دیواری تلفن همراه
یک کانکتور به نوعی برای وصل کردن به آردوینو (من یک سوکت چیپ را از وسط نصف کردم.) حداقل 3 پین.
برای جزئیات بیشتر: آردوینو را با تلفن همراه روشن کنید
در ادامه، متن انگلیسی این مطلب را میتوانید مشاهده نمایید:
Old cellphones are easy to acquire and they have built in lithium charging circuitry. What a wonderful base for a power supply for small mobile things. I hooked up a cellphone to the arduino with the ability to charge the cellphone when you plug the arduino into the usb port. Please note that this was just a quick rig and as i did not have the correct screwdrivers, does not involve taking apart the cellphone. I’m sure if you have access to the correct screwdriver you wouldn’t have to cut the cellphone charging connector and could just solder wires directly to the charging terminals. Sorry about the image quality I made it in between college classes and so i took pictures with my laptop’s webcam.
You will need:
an arduino
an old cellphone (must use 5volts as its wall wart charging voltage)
some cellphone batteries (optional, minimum one)
wires and a diode
the cellphones wall wart charger
a connector of some sort to plug into the arduino (i cut a chip socket in half for mine.) Minimum of 3 pins.
Step 1: Connecting wires to the battery
Open up the cellphone and remove the battery to reveal the battery connectors. I also removed the SIM card. Examine the battery to figure out what terminal connectors on the cellphone go to the positive and negative terminals on the battery. Solder wires to these terminals. Don’t worry about any third terminal, this is just a temperature sensor or something and is for the cellphone to worry about.
Step 2: Connect the cellphone to the arduino
Get your socket to plug into your arduino and situate it on the power area of the arduino so that it has connectors going from gnd, 5v, and 3v3. These are the only pins you will need to connect to. Solder the ground wire from your cell phone to the terminal of the connector that goes into gnd.(remove it from the arduino first!!) Then solder the +battery wire from the cellphone to a diode and then to the connector terminal going to 3v3 on the arduino so that the diodes stripe is on the arduino side. This diode prevents the arduino from trying to charge the battery when its plugged in. Now there should be an open terminal on your connector between the connected ones that goes to 5v on the arduino. We will need that later to charge the cellphone. If you want, you can stop here and it will work fine. You just won’t be able to charge the cellphone by plugging in the arduino, you’ll have to charge it with its own separate charger.
Step 3: Connect the charger
Cut of the connector off the wall wart. Check which wires are positive and negative by plugging in the wall wart and using an led to test. For me the wire with the white bad was positive and the other was negative. strip the connectors wires. Now you can either solder the negative wire to the gnd terminal on the connector or strip some insulation off the middle of the negative battery wire and solder it to that. I did the second choice. Then solder the positive wire to the empty terminal on the connector in between the 2 other wires. This one goes to 5v on the arduino.
an old cellphone (must use 5volts as its wall wart charging voltage)
some cellphone batteries (optional, minimum one)
wires and a diode
the cellphones wall wart charger
a connector of some sort to plug into the arduino (i cut a chip socket in half for mine.) Minimum of 3 pins.
For More Detail: Power Arduino with a cellphone
