

بنابراین من در کارکردن برد یاب مادون قرمز شارپ شانس آوردم و اکنون آن را به دستگاه سروو خود وصل کردم تا ببینم آیا نتایج بهتری در صفحه نمایش سبک رادار خود دارم یا خیر.
نحوه استفاده از فاصله یاب شارپ IR را در اینجا بررسی کنید
چند چیز را باید در نظر داشت، در حالی که کد تقریباً یکسان است، چند تفاوت ظریف وجود دارد. اولاً برای خواندن بهتر، کد آردوینو تاخیر بیشتری دارد - اما از آنجایی که ما اجازه پینگ سونار را نمیدهیم، تفاوت چندانی قابل توجه نیست.
در مرحله بعد، ما منتظر مقادیر صحیح در کد پردازش هستیم، بنابراین هنگام ارسال مقادیر به پورت سریال، آنها را از شناور به عدد صحیح میفرستیم.
از آنجایی که سنسور مادون قرمز محدوده متفاوتی دارد، من صفحه نمایش را طوری تغییر دادم که فقط تا 150 سانتی متر اندازه گیری کند. و به دلیل محدودیت این محدوده، اگر مقداری خارج از این محدوده ثبت شده باشد، باید آن را کنترل کنیم تا از دیدن اسپک جلوگیری کنیم و همینطور برای هر مقدار کمتر از 20 سانتی متر، باید آن را نیز مدیریت کنیم.
برای خوانایی بیشتر نمایشگر، صفحه و مساحت یکسانی را نگه می دارم (شعاع 300) و سپس مقادیر سنسور را در 2 ضرب می کنم تا کمی بیشتر بزرگ شوند.
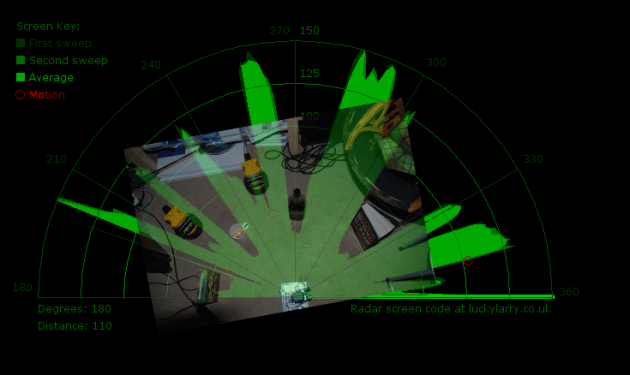
به غیر از آن، اساساً همان کد قبلی است و وقتی اکنون به مقایسه تصویر بین آنچه سنسور ضبط می کند و آنچه که از نظر فیزیکی وجود دارد نگاه می کنیم، تطابق بسیار بهتری را مشاهده می کنیم، در برخی موارد کمی دقیق است.
طرح آردوینو
/*
luckylarry.co.uk
Radar Screen Visualisation for Sharp GP2Y0A02 IR range finder
Sends sensor readings for every degree moved by the servo
values sent to serial port to be picked up by Processing
*/
#include <Servo.h>            // include the standard servo library
Servo leftRightServo;         // set a variable to map the servo
int leftRightPos = 0;         // set a variable to store the servo position
const int numReadings = 10;   // set a variable for the number of readings to take
int index = 0;                // the index of the current reading
float total = 0;              // the total of all readings must be a float to allow totaling of float values
int average = 0;              // the average
int IRpin = 1;                // analog pin for reading the IR sensor

/* setup the pins, servo and serial port */
void setup() {
  leftRightServo.attach(9);
  // initialize the serial port:
  Serial.begin(9600);
}

/* begin rotating the servo and getting sensor values */
void loop() {
  for(leftRightPos = 0; leftRightPos < 180; leftRightPos++) {  // going left to right.
    leftRightServo.write(leftRightPos);
      for (index = 0; index<=numReadings;index++) {            // take x number of readings from the sensor and average them
        float volts = analogRead(IRpin)*0.0048828125;          // value from sensor * (5/1024) - if running 3.3.volts then change 5 to 3.3
        float distance = 65*pow(volts, -1.10);                 // worked out from graph 65 = theretical distance / (1/Volts)S - luckylarry.co.uk
        total = total + distance;                              // update total
        delay(20);
      }
    average = (int) total/numReadings;                         // create average reading CAST TO INT!! remove the decimal places

    if (index >= numReadings)  {                               // reset the counts when at the last item of the array
      index = 0;
      total = 0;
    }
    Serial.print("X");                                         // print leading X to mark the following value as degrees
    Serial.print(leftRightPos);                                // current servo position
    Serial.print("V");                                         // preceeding character to separate values
    Serial.println(average);                                   // average of sensor readings
  }
  /*
  start going right to left after we got to 180 degrees
  same code as above
  */
  for(leftRightPos = 180; leftRightPos > 0; leftRightPos--) {  // going right to left
    leftRightServo.write(leftRightPos);
    for (index = 0; index<=numReadings;index++) {
      float volts = analogRead(IRpin)*0.0048828125;            // value from sensor * (5/1024) - if running 3.3.volts then change 5 to 3.3
      float distance = 65*pow(volts, -1.10);                   // worked out from graph 65 = theretical distance / (1/Volts)S - luckylarry.co.uk
      total = total + distance;
      delay(20);
    }
برای جزئیات بیشتر: آردوینو + پردازش - ساخت یک صفحه رادار - قسمت 3: تجسم داده ها از شارپ یاب مادون قرمز شارپ
در ادامه، متن انگلیسی این مطلب را میتوانید مشاهده نمایید:
So I had some luck with getting the Sharp Infrared range finder working and I’ve now plugged this on to my servo rig to see if I get better results on my radar styled display.
