

این پروژه برنامه نمونه Google Android به نام "Bluetooth Chat" را کمی تغییر می دهد، بنابراین می توانید پیامی را در برنامه Android تایپ کنید و همان پیام روی LCD متصل به Arduino Uno ظاهر می شود.
عملکرد: اندروید با آردوینو
1 صحبت میکند. برنامه نمونه Android "Bluetooth Chat" را اجرا کنید (بعد از اینکه برنامه را در این دستورالعمل تغییر دادیم). پیامی را در کادر متنی برنامه تایپ کنید و دکمه «ارسال» را فشار دهید. پیامی که تایپ کردید در صفحه نمایش برنامه بازتاب می یابد.
2. پیام از طریق هوا از مودم بلوتوث داخلی اندروید به مودم بلوتوث متصل به آردوینو Uno منتقل می شود.
3. Arduino Uno پیام تایپ شده را دریافت می کند.
4. Arduino Uno پیام تایپ شده را روی LCD چاپ می کند.
عملکرد: آردوینو با اندروید
1 صحبت می کند. آردوینو هر 30 ثانیه یک پیام ("سلام از آردوینو") از طریق بلوتوث به تلفن اندرویدی ارسال می کند.
2. پیام آردوینو در نمایشگر نمونه برنامه Android “Bluetooth Chat” ظاهر می شود.
چرا؟ فقط یک راه آسان برای آزمایش توانایی آردوینو در دریافت پیام از تلفن اندرویدی، بلکه ارسال پیام به آن. شما می توانید طرح نمونه را بگیرید و آن را هر طور که می خواهید تغییر دهید.
مرحله 1: لیست سخت افزار
- آردوینو Uno (328، 16 مگاهرتز، 5 ولت).
– مودم بلوتوث: BlueSMiRF Gold، با نام مستعار FireFly (Sparkfun sku: WRL-00582).
– ال سی دی موازی (Sparkfun sku: LCD-09051 اما می توانید تقریباً از هر LCD موازی استفاده کنید).
– پتانسیومتر 10k.
- سیم برای اتصال قطعات الکترونیکی.
– کامپیوتر و تراشه FTDI (برای تغییر نرخ BAUD).
– Android Phone (من از موتورولا دروید استفاده کردم – سیستم عامل v2.2.2 – اما گوگل کد نمونه برای همه نسخه ها دارد).
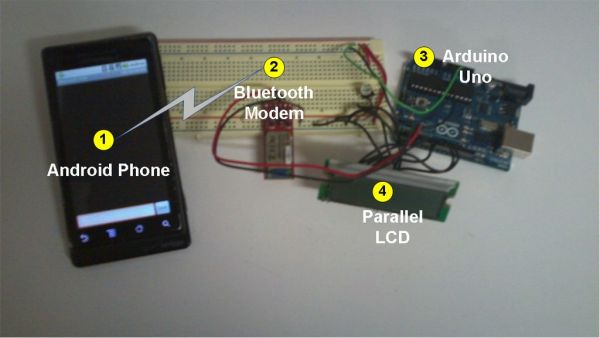
مدار خود را همانطور که در نمودار نشان داده شده است جمع آوری کنید. لازم نیست چیزی بین دایره شماره 1 و دایره شماره 2 جمع آوری کنید: این پیامی است که از اندروید به مودم بلوتوث منتقل می شود. سلام، من یک مبتدی آردوینو هستم، بنابراین چیزی را فرض نمی کنم. 
مرحله 2: لیست نرم افزار
– کد منبع آردوینو از این پروژه (bluetooth_chat_LCD.pde پیوست شده در زیر)
– کتابخانه NewSoftSerial از Mikal Hart: http://arduiniana.org/libraries/newsoftserial/
– Eclipse
– کیت توسعه اندروید (به صراحت تمام دستورالعمل های نصب گوگل را دنبال کنید)
– کد نمونه Android «Bluetooth Chat» از Google: http://developer.android.com/resources/samples/BluetoothChat/index.html
– Hyperterminal یا TeraTerm برای تغییر نرخ BAUD
مبتدیان اندروید (مثل من):
مطمئن شوید که قبل از اجرای بقیه این دستور العمل، حداقل چند تست انجام دهید:
- یک برنامه "hello, world" (مثال های زیادی در آنجا وجود دارد) ایجاد کنید تا مطمئن شوید که Android/Eclipse راه اندازی دارید. برای اجرای صحیح یک برنامه در یک دستگاه مجازی.
– گوشی اندرویدی خود را به برق وصل کنید و مطمئن شوید که می توانید برنامه “hello, world” را در گوشی خود کپی کنید. مطمئن شوید که اشکال زدایی گوشی شما روشن است. تنظیمات -> برنامه ها -> توسعه -> اشکال زدایی USB (روشن کنید)
پس از کپی کردن موفقیت آمیز یک برنامه اندروید در تلفن واقعی خود، می توانید این دستورالعمل را ادامه دهید. به خاطر داشته باشید که نمی توانید این دستورالعمل را روی یک دستگاه مجازی اجرا کنید. برای استقرار کد "چت بلوتوث" باید یک تلفن واقعی داشته باشید.
 bluetooth_chat_LCD.pde 7 کیلوبایت
مرحله 3: نرخ BAUD را در BlueSMiRF Gold تغییر دهید
نرخ BAUD را از 115.2k پیش فرض به 57.6k تغییر دهید. اگر BAUD را روی 115.2k بگذارید، ال سی دی موازی هنگام ارسال پیام از اندروید به آردوینو، گیج کننده را نشان می دهد. اگر BAUD را زیر 57.6k تنظیم کنید، تلفن اندرویدی پیامی را که طرح آردوینو هر 30 ثانیه ارسال میکند، قطع میکند. بنابراین 57.6k BAUD درست است.
مدار خود را همانطور که در نمودار نشان داده شده است جمع آوری کنید. لازم نیست چیزی بین دایره شماره 1 و دایره شماره 2 جمع آوری کنید: این پیامی است که از اندروید به مودم بلوتوث منتقل می شود. سلام، من یک مبتدی آردوینو هستم، بنابراین چیزی را فرض نمی کنم. مبتدیان اندروید (مثل من): پس از کپی کردن موفقیت آمیز یک برنامه اندروید در تلفن واقعی خود، می توانید این دستورالعمل را ادامه دهید. به خاطر داشته باشید که نمی توانید این دستورالعمل را روی یک دستگاه مجازی اجرا کنید. برای استقرار کد "چت بلوتوث" باید یک تلفن واقعی داشته باشید.
- آردوینو Uno (328، 16 مگاهرتز، 5 ولت).
– مودم بلوتوث: BlueSMiRF Gold، با نام مستعار FireFly (Sparkfun sku: WRL-00582).
– ال سی دی موازی (Sparkfun sku: LCD-09051 اما می توانید تقریباً از هر LCD موازی استفاده کنید).
– پتانسیومتر 10k.
- سیم برای اتصال قطعات الکترونیکی.
– کامپیوتر و تراشه FTDI (برای تغییر نرخ BAUD).
– Android Phone (من از موتورولا دروید استفاده کردم – سیستم عامل v2.2.2 – اما گوگل کد نمونه برای همه نسخه ها دارد).
مرحله 2: لیست نرم افزار
– کد منبع آردوینو از این پروژه (bluetooth_chat_LCD.pde پیوست شده در زیر)
– کتابخانه NewSoftSerial از Mikal Hart: http://arduiniana.org/libraries/newsoftserial/
– Eclipse
– کیت توسعه اندروید (به صراحت تمام دستورالعمل های نصب گوگل را دنبال کنید)
– کد نمونه Android «Bluetooth Chat» از Google: http://developer.android.com/resources/samples/BluetoothChat/index.html
– Hyperterminal یا TeraTerm برای تغییر نرخ BAUD
مطمئن شوید که قبل از اجرای بقیه این دستور العمل، حداقل چند تست انجام دهید:
- یک برنامه "hello, world" (مثال های زیادی در آنجا وجود دارد) ایجاد کنید تا مطمئن شوید که Android/Eclipse راه اندازی دارید. برای اجرای صحیح یک برنامه در یک دستگاه مجازی.
– گوشی اندرویدی خود را به برق وصل کنید و مطمئن شوید که می توانید برنامه “hello, world” را در گوشی خود کپی کنید. مطمئن شوید که اشکال زدایی گوشی شما روشن است. تنظیمات -> برنامه ها -> توسعه -> اشکال زدایی USB (روشن کنید)
bluetooth_chat_LCD.pde 7 کیلوبایت
برای جزئیات بیشتر: اندروید با برد آردوینو صحبت می کند
در ادامه، متن انگلیسی این مطلب را میتوانید مشاهده نمایید:
This project slightly modifies the Google Android sample app called “Bluetooth Chat” so you can type a message in the Android app and that same message will appear on an LCD attached to an Arduino Uno.
Functionality: Android talks to Arduino
1. Run the Android “Bluetooth Chat” sample app (after we modify the app in this instructable). Type a message in the app’s text box and press the “send” button. The message you typed echoes on the app display.
2. Message travels through the air from the built-in Android Bluetooth modem to the Bluetooth modem connected to the Arduino Uno.
3. Arduino Uno receives the typed message.
4. The Arduino Uno prints the typed message on the LCD.
Functionality: Arduino talks to Android
1. Every 30 seconds, the Arduino sends a message (“hello from Arduino”) to the Android phone via Bluetooth.
2. The Arduino message appears on the Android “Bluetooth Chat” sample app display.
Why? Just an easy way to test the Arduino’s ability to not only receive messages from, but send messages to the Android phone. You can take the example sketch and change it however you want.
Step 1: Hardware list
– Arduino Uno (328, 16MHz, 5V).
– Bluetooth Modem: BlueSMiRF Gold, aka FireFly (Sparkfun sku: WRL-00582).
– Parallel LCD (Sparkfun sku: LCD-09051 but you can use pretty much any parallel LCD).
– 10k Potentiometer.
– Wires to connect electronic components.
– Computer and FTDI chip (to change BAUD rate).
– Android Phone (I used a Motorola Droid – operating system v2.2.2 – but Google has sample code for all versions).
Assemble your circuit as shown in the diagram. You don’t have to assemble anything between circle #1 and circle #2: that is the message going through the air from Android to the Bluetooth modem. Hey, I’m an Arduino beginner so I’m not assuming anything.
Step 2: Software List
– Arduino Source code from this project (bluetooth_chat_LCD.pde attached below)
– NewSoftSerial library from Mikal Hart: http://arduiniana.org/libraries/newsoftserial/
– Eclipse
– Android Development Kit (explicitly follow all of Google’s installation instructions)
– “Bluetooth Chat” Android sample code from Google: http://developer.android.com/resources/samples/BluetoothChat/index.html
– Hyperterminal or TeraTerm to change BAUD rate
Android Beginners (like me):
Make sure you do at least a couple tests before you execute the rest of this instructable:
– Create a “hello, world” app (lots of examples out there) to make sure you have Android/Eclipse setup correctly to run an app on a virtual device.
– Plug in your Android phone and ensure that you can copy the “hello, world” app to your phone. Make sure your phone has debugging turned on. Settings –> Applications –> Development –> USB debugging (turn it on)
After you successfully copy an Android app to your actual phone, you can proceed with this instructable. Keep in mind that you are not going to be able to run this instructable on a virtual device; you have to have a real phone to deploy the “Bluetooth Chat” code.
bluetooth_chat_LCD.pde7 KB
Step 3: Change BAUD rate on BlueSMiRF Gold
Change the BAUD rate from the default 115.2k to 57.6k. If you leave the BAUD at 115.2k, the parallel LCD will display gibberish when you send a message from Android to Arduino. If you set the BAUD below 57.6k, the Android phone will “cut up” the message that the Arduino sketch sends every 30 seconds. So 57.6k BAUD is just right.
– Arduino Uno (328, 16MHz, 5V).
– Bluetooth Modem: BlueSMiRF Gold, aka FireFly (Sparkfun sku: WRL-00582).
– Parallel LCD (Sparkfun sku: LCD-09051 but you can use pretty much any parallel LCD).
– 10k Potentiometer.
– Wires to connect electronic components.
– Computer and FTDI chip (to change BAUD rate).
– Android Phone (I used a Motorola Droid – operating system v2.2.2 – but Google has sample code for all versions).
Assemble your circuit as shown in the diagram. You don’t have to assemble anything between circle #1 and circle #2: that is the message going through the air from Android to the Bluetooth modem. Hey, I’m an Arduino beginner so I’m not assuming anything.
Step 2: Software List
– Arduino Source code from this project (bluetooth_chat_LCD.pde attached below)
– NewSoftSerial library from Mikal Hart: http://arduiniana.org/libraries/newsoftserial/
– Eclipse
– Android Development Kit (explicitly follow all of Google’s installation instructions)
– “Bluetooth Chat” Android sample code from Google: http://developer.android.com/resources/samples/BluetoothChat/index.html
– Hyperterminal or TeraTerm to change BAUD rate
Android Beginners (like me):
Make sure you do at least a couple tests before you execute the rest of this instructable:
– Create a “hello, world” app (lots of examples out there) to make sure you have Android/Eclipse setup correctly to run an app on a virtual device.
– Plug in your Android phone and ensure that you can copy the “hello, world” app to your phone. Make sure your phone has debugging turned on. Settings –> Applications –> Development –> USB debugging (turn it on)
After you successfully copy an Android app to your actual phone, you can proceed with this instructable. Keep in mind that you are not going to be able to run this instructable on a virtual device; you have to have a real phone to deploy the “Bluetooth Chat” code.
bluetooth_chat_LCD.pde7 KB
For more detail: Android talks to Arduino board
