

سنسورهای مادون قرمز (IR) معمولاً برای اندازهگیری فاصلهها استفاده میشوند، اما میتوانند برای تشخیص اجسام نیز استفاده شوند. با اتصال چند سنسور IR به یک آردوینو، می توانید یک زنگ هشدار ایجاد کنید.
بررسی اجمالی
سنسورهای مادون قرمز (IR) معمولاً برای تخمین فاصله یک جسم استفاده می شوند، اما می توانید از آنها برای تشخیص وجود اشیا نیز استفاده کنید. سنسورهای IR از یک فرستنده IR و یک گیرنده IR تشکیل شده اند. فرستنده پالس های تابش مادون قرمز را تولید می کند، در حالی که در همان زمان، گیرنده هر گونه بازتابی را تشخیص می دهد. اگر گیرنده بازتابی را تشخیص دهد، به این معنی است که یک جسم در فاصله ای در جلوی سنسور وجود دارد. اگر بازتابی وجود نداشته باشد، پس هیچ شیئی وجود ندارد.
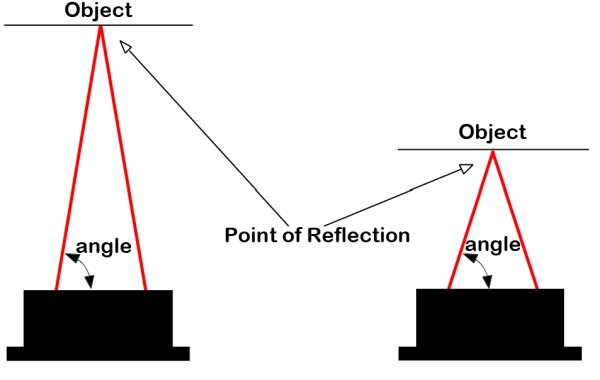
سنسور IR که در این پروژه استفاده می کنیم، یک رنجر مادون قرمز شارپ است. این سنسورها دارای یک آرایه کوچک خطی متصل به شارژ (CCD) هستند که زاویه بازگشت تابش IR به سنسور را تشخیص می دهد. همانطور که در شکل زیر نشان داده شده است، سنسور یک پالس مادون قرمز را به میدان ارسال می کند و هنگامی که جسمی در جلوی سنسور وجود دارد، پالس با زاویه ای متناسب با فاصله ای که جسم از آن فاصله دارد، به سنسور منعکس می شود. سنسور گیرنده سنسور زاویه را تشخیص داده و خروجی می دهد و با استفاده از این مقدار می توانید فاصله را محاسبه کنید.
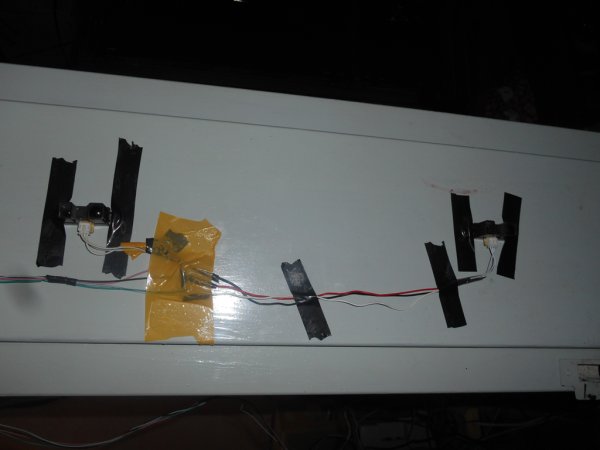
با اتصال چند سنسور IR به آردوینو، میتوانیم یک هشدار ساده برای نفوذ ایجاد کنیم. ما سنسورها را به یک درب متصل میکنیم و با تراز کردن مناسب سنسورها، میتوانیم تشخیص دهیم که شخصی از درب عبور میکند. هنگامی که این اتفاق می افتد، خروجی سنسور IR تغییر می کند و ما با خواندن مداوم خروجی سنسورهای IR با آردوینو، این تغییر را تشخیص خواهیم داد. در این مثال، ما می دانیم که وقتی خروجی سنسور IR از 400 تجاوز کند، یک شی در حال عبور از در است. هنگامی که این اتفاق می افتد، آردوینو آلارم را روی ON تنظیم می کند. برای تنظیم مجدد زنگ، کاربر می تواند یک دکمه فشاری را فشار دهد.
سخت افزار مورد نیاز
- 2 عدد سنسور IR دوربرد
- 1 عدد آردوینو Mega2560
- 1 x زنگ
- 1 عدد دکمه فشاری
- مقاومت 1×470 اهم
- 1 x ترانزیستور NPN
- سیم های جامپر
نمودار سیم کشی
مدار این پروژه در نمودار زیر نشان داده شده است. خروجی دو سنسور IR به A0 و A1 متصل می شود. دو سیم دیگر به 5 ولت و GND متصل هستند. یک زنگ 12 ولت از طریق یک ترانزیستور به پایه 3 متصل می شود و دکمه فشاری که برای خاموش کردن زنگ هشدار استفاده می شود به پایه 4 متصل می شود.
بیشتر بخوانید: زنگ هشدار حرکت با آردوینو و سنسورهای IR
در ادامه، متن انگلیسی این مطلب را میتوانید مشاهده نمایید:
Overview
Infrared (IR) sensors are normally used to estimate the distance of an object, but you can also use them to detect the presence of objects. IR sensors consist of an IR transmitter and and IR receiver. The transmitter outputs pulses of infrared radiation, while at the same time, the receiver detects any reflections. If the receiver does detect a reflection, it means that there is an object at some distance in front of the sensor. If there is no reflection, then there is no object.
The IR sensor that we are using in this project is a sharp infrared IR ranger. These sensors have a small linear charge-coupled device (CCD) array that detects the angle at which the IR radiation returns to the sensor. As shown in the figure below, the sensor transmits an infrared pulse into the field, and when there is an object in front of the sensor, the pulse is reflected back to the sensor at an angle proportional to the distance that the object is away from the sensor. The sensor’s receiver detects and outputs the angle, and using this value, you can calculate the distance.
By connecting a couple of IR sensors to an Arduino, we can make a simple intruder alarm. We will connect the sensors to a door jamb, and by properly aligning the sensors, we can detect when someone passes through the door. When this happens, the output of the IR sensor will change, and we will detect this change by continually reading the output of the IR sensors with an Arduino. In this example, we know that an object is passing through the door when the IR sensor’s output exceeds 400. When this occurs, the Arduino will set the alarm to ON. To reset the alarm, a user can press a pushbutton.
Hardware Required
- 2 x long-range IR sensors
- 1 x Arduino Mega2560
- 1 x buzzer
- 1 x pushbutton
- 1 x 470 ohm resistor
- 1 x NPN transistor
- jumper wires
Wiring Diagram
The circuit for this project is shown in the diagram below. The outputs of the two IR sensors connect to A0 and A1. The other two wires are connected to 5V and GND. A 12V buzzer is connected to pin 3 through a transistor and the pushbutton used to shut the alarm OFF connects to pin 4.
Read More: Motion-Sensing Alarm with an Arduino and IR Sensors
