

در این مقاله نحوه ساخت یک برنامه ساده بلوتوث با استفاده از اندروید استودیو و نمایش آن با استفاده از آردوینو برای جابجایی LED و ارسال داده ها به عقب و جلو توضیح داده می شود. هیچ دانش قبلی در مورد توسعه اندروید مورد نیاز نیست، اما به دانستن برخی از اصول برنامه نویسی جاوا کمک می کند. من از یک تلفن اندرویدی برای اهداف آزمایشی استفاده خواهم کرد و نه یک دستگاه مجازی اندروید. برنامه اندرویدی که شما توسعه می دهید می تواند با هر میکروکنترلر دیگری استفاده شود، من در این مثال فقط از آردوینو با ماژول بلوتوث HC-06 استفاده کردم زیرا هم ارزان و هم محبوب هستند. من قصد دارم پست های دیگری را با میکروکنترلرهای مختلف ایجاد کنم که از همین برنامه تلفن استفاده می کنند. برخی از قابلیت هایی که من استفاده خواهم کرد از سند رسمی بلوتوث SDK گرفته شده است . من همچنین ایده هایی را از این پست وبلاگ استخراج کردم .
توسعه اندروید
نصب و راه اندازی
اگر قبلاً این کار را نکردهاید، IDE و SDK Android را دانلود و نصب کنید .
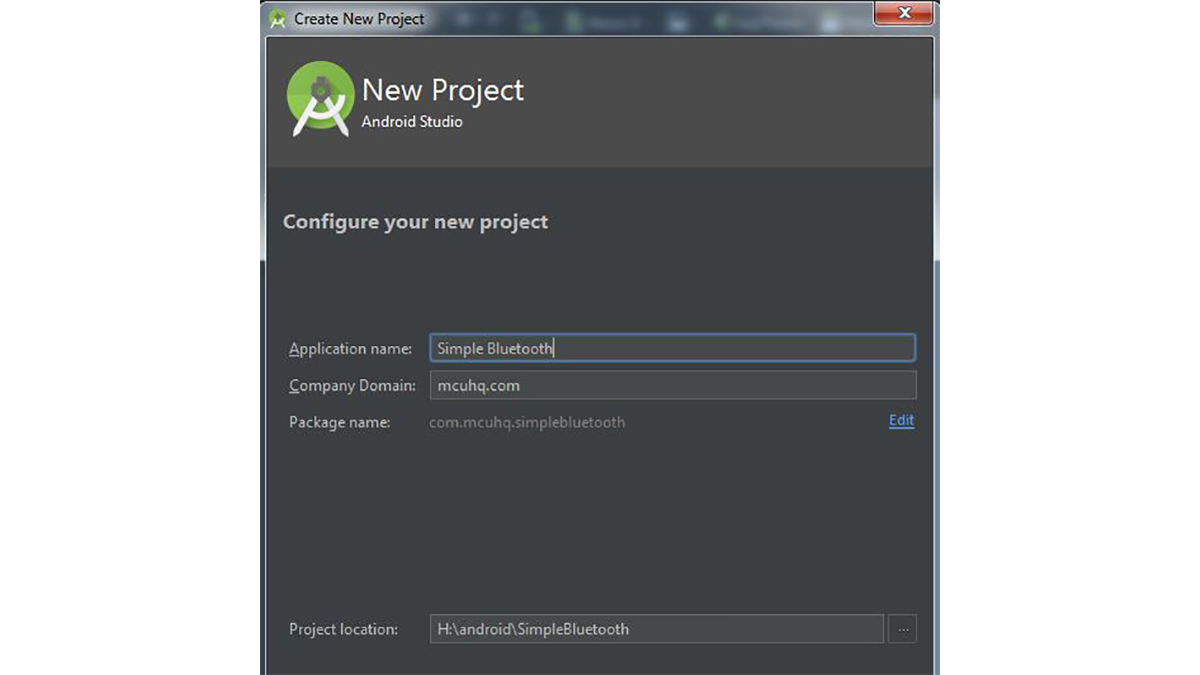
- با رفتن به "File->New Project" یک پروژه جدید ایجاد کنید.
- من نام پروژه خود را "Simple Bluetooth" و دامنه شرکت خود را "mcuhq.com" گذاشتم.
- حداقل نسخه API به صورت خودکار برای من در زمان نوشتن 15 انتخاب شد که 97.3٪ از تمام دستگاه های موجود در بازار را پوشش می دهد (پوشش بسیار خوبی را می توانم بگویم). همه چک باکس های دیگر را خالی بگذارید زیرا به آنها نیازی نداریم.
- "فعالیت خالی" را انتخاب کنید
- Activity Name را به صورت پیش فرض نگه دارید
MainActivity. - اکنون پروژه شما ایجاد خواهد شد. باید چیزی شبیه این باشد:
چیدمان رابط کاربری گرافیکی
من ابتدا طرح رابط کاربری گرافیکی را می سازم زیرا درک آنچه که می خواهیم از طریق عناصر بصری انجام دهیم آسان تر است. سازنده رابط کاربری گرافیکی شباهت هایی مانند لنگرها و مدیریت های چیدمان مشابه جاوا Swing دارد. LinearLayout (Vertical)ما از آن برای ساخت برنامه خود استفاده خواهیم کرد . بدون مدیر طرح بندی، اجزای رابط کاربری گرافیکی شما بسته به اندازه صفحه نمایش دستگاه، خود را به طور متفاوتی ترتیب می دهند. انتخاب طرحبندی پیشفرض این است RelativeLayoutو با همتراز کردن همه اجزا در رابطه با اولین مؤلفه قرار داده شده روی صفحه (یا همانطور که شما دیکته میکنید) کار میکند. شما می توانید این افکت را با باز کردن activity_main.xmlدر app/res/layoutساختار پوشه خود و کشیدن یک جزء متنی روی صفحه مشاهده کنید. توجه کنید که چگونه یک خط سبز رابطه لنگر آن را نشان می دهد.
با جابجایی متن پیشفرض Hello World!، اکنون متنی که به تازگی قرار دادهاید، جابهجا میشود. ساختن یک برنامه با استفاده از این RelativeLayoutساده و آسان است، اما اغلب باعث سردرد با صفحه نمایش بزرگتر یا کوچکتر از صفحه نمایشی که در حال توسعه آن هستید، می شود.
LinearLayout (Vertical)از پالت به درخت جزء بکشید . سپس یک چک باکس را از پالت به صفحه فعالیت اصلی خود بکشید و روی آن دوبار کلیک کنید تا آن را "Toggle LED" نامید. آن را در وسط صفحه تراز کنید. این چک باکس برای روشن و خاموش کردن یک LED در آردوینو استفاده خواهد شد. صفحه کامپوننت شما اکنون باید شبیه به آن باشد
بیشتر بخوانید: برنامه ساده بلوتوث اندروید با مثال آردوینو
در ادامه، متن انگلیسی این مطلب را میتوانید مشاهده نمایید:
This article will detail how to make a simple bluetooth application using Android Studio and demo it using an Arduino to toggle an LED and send data back-and-forth. No prior knowledge of Android development is needed, however it will help to know some basics of Java programming. I will be using an Android phone for testing purposes and not an Android virtual device. The Android app that you develop can be used with any other microcontroller, I only used the Arduino in this example with the HC-06 bluetooth module since they are both cheap and popular. I’m going to be creating other posts with different microcontrollers that use this same phone app. Some of the funtionality that I will be using was taken from the offical bluetooth SDK doc. I also derived some ideas from this blog post.
Android Development
Install and Setup
If you haven’t already, download and install the Android IDE and SDK.
- Create a new project by navigating to “File->New Project”
- I named my project “Simple Bluetooth” and my company domain as “mcuhq.com”.
- The minimum API version was auto-selected to be at 15 for me at the time of writting which covers 97.3% of all devices on the market (pretty good coverage I’d say). Leave all of the other checkboxs blank since we won’t be needing them.
- Select the “Empty Activity”
- Keep the Activity Name default as
MainActivity. - Your project will now be created. It should look something like this:
GUI layout
I will be making the GUI layout first since it is easier to grasp what we are trying to do via the visual elements. The GUI builder has similarities such as anchors and layout managers similar to Java Swing. We will be using the LinearLayout (Vertical) to make our application. Without a layout manager, your GUI components would arrange themselves differently depending on the screen size of the device. The default layout choice is the RelativeLayout and works by aligning all of the components in relation to the first component placed on the screen (or as dictated by you). You can see this effect by opening activity_main.xml found in your app/res/layout folder structure and dragging a text component onto the screen. Notice how a green line indicates its anchor relationship.
Moving the default Hello World! text will now move the text that you just placed. Making an app using this RelativeLayout is straightforward and easy, but often causes headaches with larger or smaller screens than the one you are developing on.
Drag the LinearLayout (Vertical) from the Palette to the component tree. Then drag a checkbox from the Palette to your main activity screen and double-click on it to call it “Toggle LED”. Align it in the middle of the screen. This checkbox will be used to turn ON and OFF an LED on the Arduino. Your Component screen should now look like
Read More: Simple Android Bluetooth Application with Arduino Example
