

خیلی وقت ها با گرمای حاوی قهوه مواجه می شویم و نمی دانیم که مایع در دمای مناسبی است یا نه و نمی توان فهمید که فقط با نگاه کردن به بطری با قهوه سرد زمان را از دست می دهیم و از این موضوع ناراحت می شویم. آی تی.
با این حال این نشان می دهد که سازنده توسط یک نمودار LED اگر مایع گرم، گرم یا سرد است. ال ای دی ها به تدریج رنگ آبی (سرد) را به قرمز (گرم) وصل می کنند، زمانی که گرما وجود دارد و در هنگام خنک شدن خاموش می شوند.
مرحله 2: سنسور
حسگر دما از نوک دماسنج دیجیتال برداشته شد و مطابق شکل زیر به آردوینو متصل شد:
سنسور با سیم بلند داخل بطری شیشه ای قرار گرفت.
من کدی را توسعه دادم که بر اساس کد دیگری بود که گرافیک LED را کنترل می کرد که اصلاح شده و با نیازهای پروژه سازگار شده بود. در این برنامه همچنین می توانید پورت سریال مقدار IDE آردوینو را که توسط سنسور خوانده می شود و تعداد LED های خاموش را مشاهده کنید.
یافته ها:
امکان تشخیص تغییر تدریجی دمای سیال در نتیجه حرارتی سرد یا گرم کردن نمودار LED ها وجود داشت.
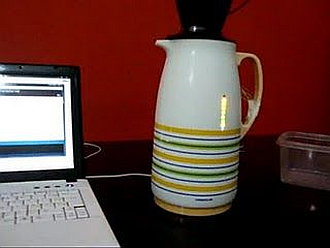
برای توسعه پروژه از: * 1 سنسور دما در دماسنج های دیجیتال یافت می شود. * 9 LED رنگی: 1 قرمز، 4 زرد، 3 verdes، 1 آبی. * 1 مقاومت 10K (قهوه ای، مشکی و نارنجی). * 1 آردوینو. * 1 حرارتی. * سیم ها. نه سوراخ در کنار حرارتی با یک آهن داغ به همان قطر LED ها حفر شد. سیم ها لیدهای پین های 5 ao 13 را به هم وصل کردند نمای داخلی دیوار LED حرارتی:
برای جزئیات بیشتر: Smart Thermal + Arduino
در ادامه، متن انگلیسی این مطلب را میتوانید مشاهده نمایید:
Many times we are faced with a heat containing coffee and don’t know if the fluid is at the proper temperature and it is impossible to know just by looking at the bottle ended up losing time with a coffee that is cold and we get upset about it.
This however indicates maker by a graph LEDs if the liquid is hot, warm or cold. The LEDs gradually connect the blue (cold) to red (hot), when there is a heating and go off when there is a cooling.
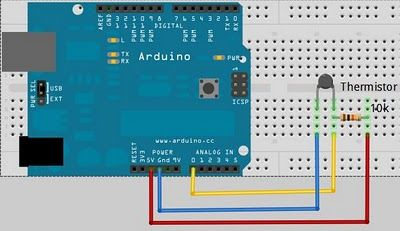
Step 2: Sensor
The temperature sensor was removed from the tip of the digital thermometer and connected to the Arduino as shown below:
The sensor was placed inside the glass bottle with a long wire.
I developed a code that was based on another that controls the LED graphics that was modified and adapted to the needs of the project. In this program you can also see the serial port of the Arduino IDE value read by the sensor and the number of LEDs that are off.
Results:
It was possible to detect the gradual change in temperature of the fluid within the thermal result of cooling or heating the graph of LEDs.
To develop the project were used:
* 1 temperature sensor found in digital thermometers.
* 9 colored LEDs: 1 red, 4 yellow, 3verdes, 1 blue.
* 1 resistêcia 10K (Brown, Black and Orange).
* 1 Arduino.
* 1 thermal.
* wires.
Nine holes were drilled in the side of the thermal with a hot iron of the same diameter of the LEDs.
Wires connected the leds of the pins 5 ao 13
Internal view of wall of LED thermal:
For more detail: Smart Thermal + Arduino
[/membership]
