

در این پروژه قصد داریم با استفاده از Arduino Uno یک دماسنج دیجیتال بسازیم . ما از سنسور دمای DS18B20 برای تشخیص دما و Nokia 5110 LCD برای نمایش آن استفاده خواهیم کرد. DS18B20 یک سنسور دمای دیجیتال 1 سیم است که توسط Maxim Integrated ساخته شده است و قادر است درجه سانتیگراد را با دقت 9 تا 12 بیت گزارش دهد.

اجزای مورد نیاز
- آردوینو اونو
- سنسور دما DS18B20
- ال سی دی نوکیا 5110
- پتانسیومتر 1KΩ
- مقاومت 10KΩ - 4
- مقاومت 4.7KΩ
- مقاومت 1KΩ
- مقاومت 330Ω
- سیم های اتصال
- تخته نان
توضیح
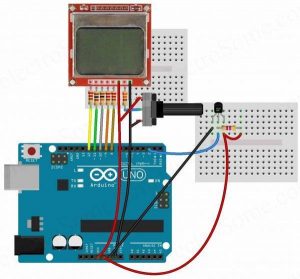
ابتدا Nokia 5110 LCD را به صورت زیر به آردوینو متصل می کنیم.
- پین GND LCD نوکیا 5110 را به GND آردوینو وصل کنید.
- پین LED Nokia 5110 LCD را از طریق مقاومت 330Ω به پایه وسط پتانسیومتر 1KΩ وصل کنید و دو پایه دیگر پتانسیومتر را به VCC، GND وصل کنید.
- پین VCC LCD نوکیا 5110 را به پایه خروجی 3.3 ولت آردوینو وصل کنید.
- پایه CLK Nokia 5110 LCD را از طریق یک مقاومت 10KΩ به پایه 8 آردوینو متصل کنید.
- پایه DIN LCD نوکیا 5110 را از طریق یک مقاومت 10KΩ به پایه 9 آردوینو وصل کنید.
- پایه D/C Nokia 5110 LCD را از طریق یک مقاومت 10KΩ به پایه 10 آردوینو متصل کنید.
- پایه SCE Nokia 5110 LCD را از طریق یک مقاومت 1KΩ به پایه 11 آردوینو متصل کنید.
- پایه RST Nokia 5110 LCD را از طریق یک مقاومت 10KΩ به پایه 12 آردوینو متصل کنید.
سپس سنسور دمای DS18B20 را به صورت زیر به آردوینو متصل کنید.
- پایه سمت چپ DS18B20 را به GND آردوینو وصل کنید.
- پایه سمت راست DS18B20 را به خروجی 5 ولت آردوینو وصل کنید.
- پایه میانی DS18B20 را به پایه 2 آردوینو وصل کنید
- یک مقاومت 4.7KΩ را از پایه میانی DS18B20 به 5 ولت به عنوان بالا کشیدن وصل کنید.
بیشتر بخوانید: دماسنج دیجیتال با استفاده از سنسور آردوینو و DS18B20
در ادامه، متن انگلیسی این مطلب را میتوانید مشاهده نمایید:
In this project, we are going to make a Digital Thermometer using Arduino Uno. We will use DS18B20 temperature sensor to sense the temperature and Nokia 5110 LCD to display it. DS18B20 is a 1-Wire digital temperature sensor manufactured by Maxim Integrated and is capable of reporting degree celsius with 9 ~ 12 bit precision.
Components Required
- Arduino Uno
- DS18B20 Temperature Sensor
- Nokia 5110 LCD
- 1KΩ Potentiometer
- 10KΩ Resistors – 4
- 4.7KΩ Resistor
- 1KΩ Resistor
- 330Ω Resistor
- Connecting Wires
- Breadboard
Explanation
First we will connect Nokia 5110 LCD to Arduino as follows.
- Connect the GND pin of Nokia 5110 LCD to GND of Arduino.
- Connect the LED pin of Nokia 5110 LCD to middle pin of 1KΩ potentiometer through 330Ω resistor and connect other two pins of the potentiometer to VCC, GND.
- Connect the VCC pin of Nokia 5110 LCD to 3.3V output pin of Arduino.
- Connect the CLK pin of Nokia 5110 LCD to Pin 8 of Arduino through a 10KΩ resistor.
- Connect the DIN pin of Nokia 5110 LCD to Pin 9 of Arduino through a 10KΩ resistor.
- Connect the D/C pin of Nokia 5110 LCD to Pin 10 of Arduino through a 10KΩ resistor.
- Connect the SCE pin of Nokia 5110 LCD to Pin 11 of Arduino through a 1KΩ resistor.
- Connect the RST pin of Nokia 5110 LCD to Pin 12 of Arduino through a 10KΩ resistor.
Then connect DS18B20 temperature sensor to Arduino as follows.
- Connect left pin of DS18B20 to GND of Arduino.
- Connect right pin of DS18B20 to 5V output of Arduino.
- Connect middle pin of DS18B20 to Pin 2 of Arduino
- Connect a 4.7KΩ resistor from middle pin of DS18B20 to 5V as pull up.
Read More: Digital Thermometer using Arduino and DS18B20 Sensor
