

این مثال به شما نشان می دهد که چگونه با استفاده از یک پتانسیومتر ورودی آنالوگ را از دنیای فیزیکی بخوانید. پتانسیومتر یک وسیله مکانیکی ساده است که در هنگام چرخاندن شفت ، مقاومت متفاوتی را ایجاد می کند. با عبور ولتاژ از یک پتانسیومتر و به ورودی آنالوگ در آردوینو، می توان میزان مقاومت تولید شده توسط یک پتانسیومتر (یا به اختصار پات ) را به عنوان مقدار آنالوگ اندازه گیری کرد. در این مثال شما وضعیت پتانسیومتر خود را پس از برقراری ارتباط سریال بین آردوینو و رایانه خود نظارت خواهید کرد.
جریان
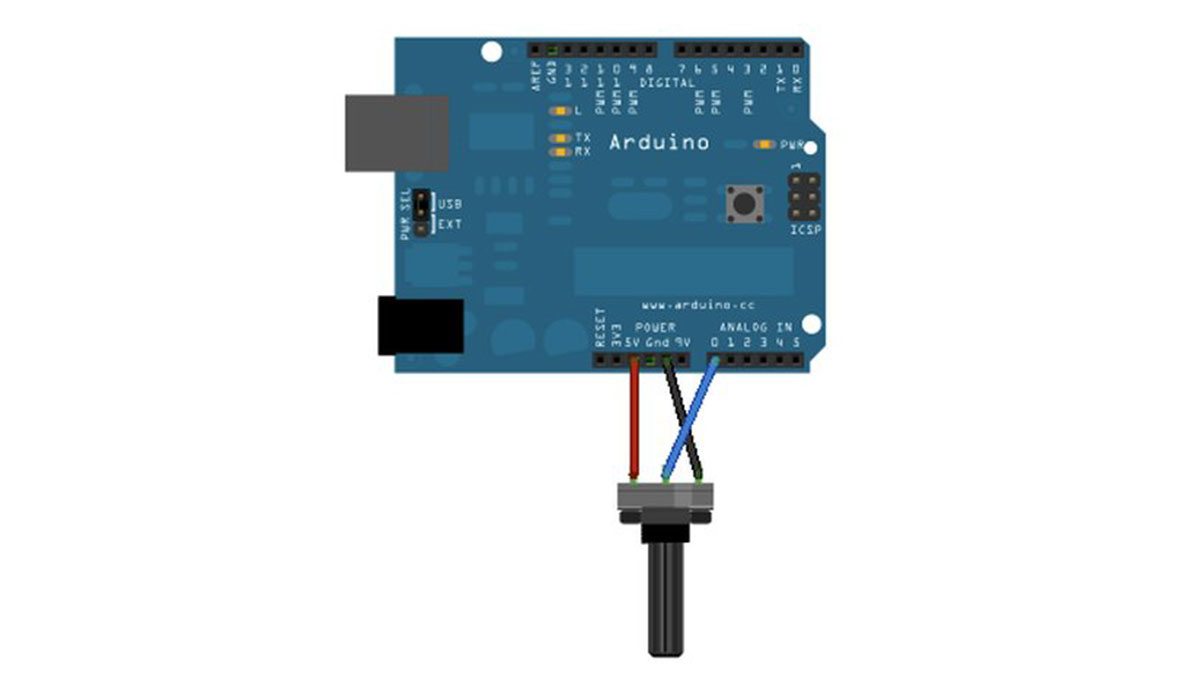
سه سیم را از پتانسیومتر به برد آردوینو وصل کنید. اولی از یکی از پین های بیرونی پتانسیومتر به زمین می رود. دومی از 5 ولت به پین بیرونی دیگر پتانسیومتر می رود. سومی از ورودی آنالوگ 0 به پایه میانی پتانسیومتر می رود.
تصویر با استفاده از Fritzing ایجاد شده است . برای نمونه مدارهای بیشتر، صفحه پروژه فریتزینگ را ببینید
با چرخاندن شفت پتانسیومتر میزان مقاومت دو طرف برف پاک کن که به پین مرکزی پتانسیومتر متصل است را تغییر می دهید. این باعث تغییر ولتاژ در پایه مرکزی می شود. هنگامی که مقاومت بین مرکز و طرف متصل به 5 ولت نزدیک به صفر است (و مقاومت طرف دیگر نزدیک به 10 کیلو اهم است)، ولتاژ در پایه مرکزی به 5 ولت نزدیک می شود. هنگامی که مقاومت ها معکوس می شوند، ولتاژ در پایه مرکزی به 0 ولت یا زمین نزدیک می شود. این ولتاژ همان ولتاژ آنالوگ است که شما به عنوان ورودی می خوانید.
آردوینو دارای مداری به نام مبدل آنالوگ به دیجیتال است که این ولتاژ در حال تغییر را خوانده و آن را به عددی بین 0 تا 1023 تبدیل میکند. هنگامی که شفت تا انتها در یک جهت چرخانده میشود، 0 ولت به سمت پین میرود. و مقدار ورودی 0 است. هنگامی که شفت کاملاً در جهت مخالف چرخانده می شود، 5 ولت به پین می رود و مقدار ورودی 1023 است. در این بین analogRead () عددی بین 0 تا 1023 را برمی گرداند که متناسب با مقدار ولتاژ اعمال شده به پین است.
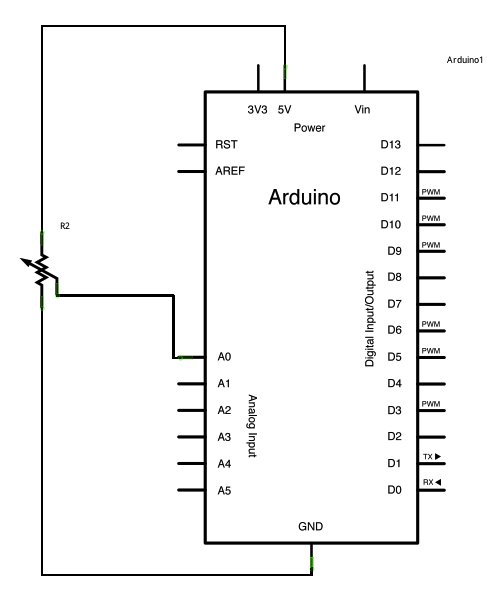
شماتیک
کد
در برنامه زیر، تنها کاری که در تابع راهاندازی انجام میدهید این است که ارتباطات سریال را با سرعت 9600 بیت در ثانیه بین آردوینو و کامپیوتر خود با دستور زیر آغاز کنید:
Serial.begin(9600);
در مرحله بعد، در حلقه اصلی کد خود، باید یک متغیر برای ذخیره مقدار مقاومت (که بین 0 تا 1023 خواهد بود، مناسب برای یک int نوع داده ) ایجاد کنید که از پتانسیومتر شما وارد می شود:
int sensorValue = analogRead(A0);
سخت افزار مورد نیاز
برای جزئیات بیشتر: سریال خواندن آنالوگ با استفاده از آردوینو
در ادامه، متن انگلیسی این مطلب را میتوانید مشاهده نمایید:
This example shows you how to read analog input from the physical world using a potentiometer. A potentiometer is a simple mechanical device that provides a varying amount of resistance when its shaft is turned. By passing voltage through a potentiometer and into an analog input on your Arduino, it is possible to measure the amount of resistance produced by a potentiometer (or pot for short) as an analog value. In this example you will monitor the state of your potentiometer after establishing serial communication between your Arduino and your computer.
Circuit
Connect the three wires from the potentiometer to your Arduino board. The first goes to ground from one of the outer pins of the potentiometer. The second goes from 5 volts to the other outer pin of the potentiometer. The third goes from analog input 0 to the middle pin of the potentiometer.
image developed using Fritzing. For more circuit examples, see the Fritzing project page
By turning the shaft of the potentiometer, you change the amount of resistance on either side of the wiper which is connected to the center pin of the potentiometer. This changes the voltage at the center pin. When the resistance between the center and the side connected to 5 volts is close to zero (and the resistance on the other side is close to 10 kilohms), the voltage at the center pin nears 5 volts. When the resistances are reversed, the voltage at the center pin nears 0 volts, or ground. This voltage is the analog voltage that you’re reading as an input.
The Arduino has a circuit inside called an analog-to-digital converter that reads this changing voltage and converts it to a number between 0 and 1023. When the shaft is turned all the way in one direction, there are 0 volts going to the pin, and the input value is 0. When the shaft is turned all the way in the opposite direction, there are 5 volts going to the pin and the input value is 1023. In between, analogRead() returns a number between 0 and 1023 that is proportional to the amount of voltage being applied to the pin.
Schematic
Code
In the program below, the only thing that you do will in the setup function is to begin serial communications, at 9600 bits of data per second, between your Arduino and your computer with the command:
Serial.begin(9600);
Next, in the main loop of your code, you need to establish a variable to store the resistance value (which will be between 0 and 1023, perfect for an int datatype) coming in from your potentiometer:
int sensorValue = analogRead(A0);
Hardware Required
- Arduino Board
- 10-kilohm Potentiometer
For more detail: Analog Read Serial using Arduino
[/membership]