

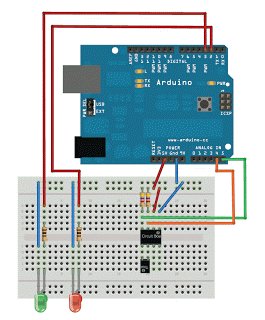
اگر می خواهید حساسیت لمسی را در پروژه خود ادغام کنید، این برد فقط می تواند این کار را انجام دهد. این یک سنسور لمسی خازنی است. این حسگرها در لوازم الکترونیکی مصرفی روزمره ما مانند پدهای لمسی نوت بوک، کنسول های بازی ویدیویی، صفحه نمایش لمسی ... فقط به نام چند مورد استفاده می شوند.
آنها بر اساس اصل تغییر میدان الکترواستاتیک کار می کنند. حسگر یک میدان الکترواستاتیک ایجاد می کند که در صورت تماس اجسام رسانا با میدان تغییر می کند.
در این حالت انگشت شما جسم رسانایی است که باعث ایجاد تغییر در میدان می شود. برای اطلاعات دقیق در مورد سنجش خازنی به اینجا نگاه کنید .
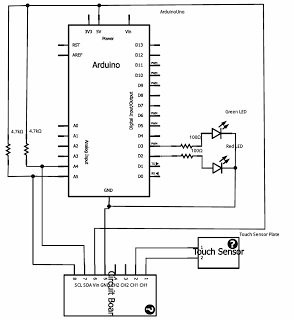
برد در حالت I2C کار می کند و به مقاومت های کششی برای پین های SDA و SCL نیاز دارد. محدوده ولتاژ کاری از 2.7 ولت تا 5.25 ولت است، بنابراین می توانید از سوکت 3.3 ولت یا 5 ولت آردوینو استفاده کنید.
راه اندازی بسیار آسان است. من دو LED وصل کردم تا نشان دهد صفحه سنسور لمس شده است یا خیر.
پی بردن به ارتباط با دستگاه کمی مشکل است.
من یک پست وبلاگ واقعاً خوب از مارکوس نووتنی پیدا کردم که یک کد نمونه ارائه می دهد، بنابراین هنگام تلاش برای درک دیتاشیت نیازی به سردرد ندارید .
اگر همه چیز را به درستی متصل کرده باشید، می توانید از حس خازنی در پروژه خود لذت ببرید.
برای جزئیات بیشتر: حسگر لمسی خازنی در آردوینو
در ادامه، متن انگلیسی این مطلب را میتوانید مشاهده نمایید:
If you ever wanted to integrate touch sensitivity into your project, this board could just do the trick. It’s a capacitive touch sensor. These sensors are used in our everyday consumer electronics like notebook trackpads, video game consoles, touchscreens…just to name a few.
They work on the principle of alteration of the electrostatic field. The sensor builds up an electrostatic field which will be altered if conductive objects get in contact with the field.
In this case your finger is the conductive object which triggers the change in the field. For detailed information about capacitive sensing have a look here.
The board works in I2C mode and needs pull-up resistors for the SDA and SCL pins. The operating voltage range is from 2.7V to 5.25V, so you can use either the 3.3V or 5V socket of the Arduino.
The setup is pretty easy. I attached two LEDs to indicate if the sensor plate was touched.
Figuring out the communication with the device is a little bit tricky.
I found a really good blog post from Marcus Nowotny who provides a sample code, so you don’t have to get a headache while trying to understand the datasheet.
If you hooked up everything correctly, you can enjoy capacitive sensing in your project.
For more detail: Capacitive Touch Sensor on Arduino
