

در این پروژه به شما نشان خواهیم داد که چگونه می توانید با استفاده از آردوینو یک اهم متر بسازید.

اهم متر وسیله ای است که می تواند مقاومت را اندازه گیری کند.
اغلب اوقات، اهم مترها دستگاه های مستقلی نیستند، بلکه به عنوان یکی از انواع دستگاه های اندازه گیری در بین بسیاری از دستگاه های مولتی متر ظاهر می شوند. امروزه یک مولتی متر پیشرفته دارای اهم متر، ولت متر، آمپرسنج، ظرفیت سنج، تستر تداوم و احتمالاً سنسور دما خواهد بود. برای این مدار، ما فقط قصد داریم یک اهم متر بسازیم تا مقاومت را اندازه گیری کنیم.
با استفاده از رابط سخت افزاری صحیح و کد آپلود شده، می توانیم آردوینو را به دستگاهی تبدیل کنیم که می تواند مقاومت را اندازه گیری کند.
قطعات مورد نیاز
- آردوینو
- مقاومت 1KΩ
- مقاومت (که می خواهید مقدار آن را اندازه گیری کنید)
اینها همه قطعاتی هستند که به آنها نیاز خواهید داشت. مدار بسیار ابتدایی است، همانطور که در زیر خواهید دید.
شماتیک مدار
شماتیک مدار اهم متر با استفاده از آردوینو در زیر نشان داده شده است.
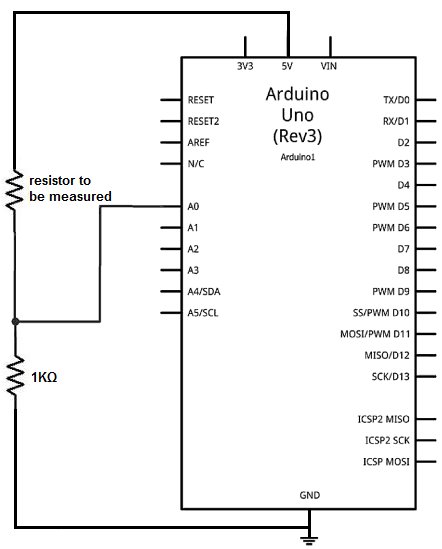
نحوه کار این مدار اهم متر به این صورت است که 2 مقاومت سری یک مدار تقسیم کننده ولتاژ را تشکیل می دهند. یک سر جفت مقاومت تا 5 ولت و سر دیگر به زمین وصل شده است. 5 ولتی که آردوینو ارائه می دهد بسته به مقدار 2 مقاومت بین 2 مقاومت تقسیم می شود. مقاومتی که مقاومت بیشتری داشته باشد، طبق فرمول قانون اهم، V=IR، ولتاژ بیشتری دریافت می کند. ولتاژی که بر روی یک قطعه می افتد با مقدار مقاومت آن نسبت مستقیم دارد. با استفاده از این اصل، میتوانیم یک مدل ریاضی برای تعیین مقاومت بر اساس تقسیم ولتاژ تنظیم کنیم.
برای جزئیات بیشتر: نحوه ساخت اهم متر با استفاده از آردوینو
در ادامه، متن انگلیسی این مطلب را میتوانید مشاهده نمایید:
In this project, we will show how you can build an ohmmeter using an arduino.
An ohmmeter is a device that can measure resistance.
Most of the times now, ohmmeters aren’t standalone devices but appear as one of type of measuring device amongst many in a multimeter. An advanced multimeter, today, would have an ohmmeter, voltmeter, ammeter, capacitance meter, continuity tester, and possibly a temperature sensor. For this circuit, we are only going to build an ohmmeter, as to measure resistance.
Using the correct hardware interface and uploaded code, we can turn the arduino into a device that can measure resistance.
Parts Needed
- Arduino
- 1KΩ resistor
- Resistor (whose value you want to measure)
These are all the parts which you will need. The circuit is very basic, as you will see below.
Circuit Schematic
The circuit schematic for the ohmmeter using an arduino is shown below.
How this ohmmeter circuit works is that the 2 resistors in series forms a voltage divider circuit. One end of the resistor pair is hooked up to 5V and the other end is hooked up to ground. The 5 volts that the arduino provides gets divided up between the 2 resistors, depending on the value of the 2 resistors. The resistor which holds the greater resistance gets more of the voltage, according to ohm’s law formula, V=IR. The voltage that falls across a component is directly proportional to the amount of resistance it contains. Using this principle, we can set up a mathematical model to determine the resistance, based on the voltage division.
For more detail: How to Build an Ohmmeter Using an Arduino
