

دانستن مقدار آب در یک مخزن سقفی می تواند یک کار خسته کننده باشد. معمولاً در نهایت از پلههای مخزن بالا میروید و سطح را به صورت دستی بررسی میکنید یا صدای سرریز شدن آب از بالا را میشنوید. اما این روزها نشانگرهای الکترونیکی سطح آب برای رفع این مشکل در دسترس هستند، اما اغلب با قیمت گزافی همراه هستند و معمولاً نصب آنها دشوار است. اکثر سیستم های موجود از الکترودهای غوطه ور یا سوئیچ های شناور استفاده می کنند که در دراز مدت می تواند سردرد باشد. ما یک رویکرد متفاوت برای شناخت سطح آب با استفاده از یک ماژول اولتراسونیک با آردوینو ارائه می دهیم. مزیت این روش این است که بدون تماس است، بنابراین مسائلی مانند خوردگی الکترودها بر این سیستم تأثیر نمی گذارد. علاوه بر این، نصب این نشانگر سطح آب آردوینو بسیار ساده تر از سیستم های معمولی است.
مواد مورد نیاز
- میکروکنترلر ATMega328P یا برد آردوینو
- ماژول محدوده التراسونیک HC-SR04 (معروف به سنسور PING)
- مقاومت 10K
- کریستال 16 مگاهرتز
- خازن های دیسک 22 pf : 2 شماره
- سیم های اتصال
- رگولاتور LM7805 5 ولت
- باتری 9 ولت و کانکتور
- خازن الکترولیتی 10uF
- PCB یا برد برد
- سیم کش
نرم افزار مورد نیاز: Arduino IDE
چگونه کار می کند؟
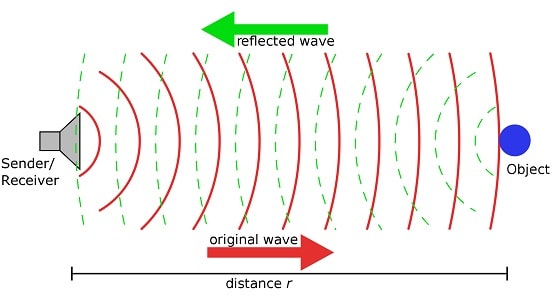
این نشانگر سطح آب آردوینو از سنسور اولتراسونیک یا سنسور پینگ برای تعیین سطح آب در مخزن استفاده می کند. سنسور پینگ فاصله را با استفاده از سونار اندازه گیری می کند. یک پالس اولتراسونیک (بسیار بالاتر از شنوایی انسان) از دستگاه منتقل می شود و فاصله تا هدف با اندازه گیری زمان لازم برای بازگشت اکو تعیین می شود. خروجی از سنسور Ping یک پالس با عرض متغیر است که با فاصله تا هدف مطابقت دارد. سپس به میکروکنترلری داده می شود که سطح آب را تعیین می کند و آن را از طریق یک سری LED نمایش می دهد.
اگر شما یک برد آردوینو دارید یا مستقیماً به یک میکروکنترلر ATmega 328 روی برد برد دارید، پروژه زیر را می توان به برد آردوینو متصل کرد. همچنین میتوانید آموزش هک کردن DIY از جف را بررسی کنید تا ارتباط حسگر اولتراسونیک با آردوینو را بیاموزید.
کد برای نشانگر سطح آب آردوینو
طرح ارائه شده را در Arduino IDE کپی کنید و خط "int d=18;" را پیدا کنید. و "18" را به عمق مخزن خود بر حسب سانتی متر تغییر دهید.
بیشتر بخوانید: نحوه ساخت نشانگر سطح آب با آردوینو
در ادامه، متن انگلیسی این مطلب را میتوانید مشاهده نمایید:
Knowing the amount of water in an overhead tank can be one tedious task. Usually, you’ll end up climbing up the stairs to the tank and checking the level manually or you’ll you hear the water overflowing from the top. But these days electronic water level indicators are available to fix this problem, but they often come with a hefty price tag and are usually difficult to install. Most of the available systems use dipped electrodes or float switches, which can be a headache in the long run. We present a different approach to knowing the water level using an Ultrasonic module with Arduino. The advantage of this method is that it is contactless, so issues like corrosion of the electrodes won’t affect this system. Furthermore, this Arduino water level indicator it is much easier to install than regular systems.
Required Materials
- ATMega328P microcontroller or Arduino board
- HC-SR04 Ultrasonic Ranging Module (aka PING sensor)
- 10K Resistor
- 16Mhz Crystal
- 22pf Disc capacitors: 2Nos
- Connecting wires
- LM7805 5V regulator
- 9V battery and connector
- 10uF electrolytic capacitor
- PCB or breadboard
- Wire stripper
Software needed: Arduino IDE
How Does it Work?
This Arduino water level indicator uses an ultrasonic sensor or Ping sensor to determine the level of water in the tank. The Ping sensor measures distance using sonar. An ultrasonic (well above human hearing) pulse is transmitted from the unit and distance-to-target is determined by measuring the time required for the echo return. Output from the Ping sensor is a variable-width pulse that corresponds to the distance to the target. This is then fed to the microcontroller that determines the water level and displays it through a series of LEDs.
The following project can be interfaced to an Arduino board if you have one or directly to an ATmega 328 microcontroller on a breadboard. You can also check out the DIY Hacking tutorial from Jeff to learn to interface an ultrasonic sensor to Arduino.
Code for the Arduino Water Level Indicator
Copy-paste the provided sketch in the Arduino IDE and find the line “ int d=18;” and change ‘18’ to the depth of your tank in centimeters.
