

مدتی است که به دنبال راهی برای اندازه گیری ولتاژ باتری اصلی و اوقات فراغت و دمای داخل و خارج وانت هستم. من سالها را صرف تحقیق کردم و چند نکته اینجا و آنجا پیدا کردم که ممکن است کمک کند، اما هیچ چیز برای انجام این کار، و واقعاً رضایتبخش نبود، تا اینکه در نهایت پیوندی به وبسایت آردوینو پیدا کردم. قبلاً هرگز در مورد آن نشنیده بودم، کمی مطالعه کردم و عالی به نظر می رسید. بنابراین من تصمیم گرفتم مدارهای لازم را طراحی و بسازم ... در زیر خلاصه ای کوتاه از آنچه به دست آوردم آمده است. قبل از اینکه ادامه بدهم، باید کلاهم را در این جهت نوک کنم - به نظر می رسد که tobes49 ابتدا به آن فکر کرده است: http://www.vwt4forum.co.uk/showthread.php?t=198976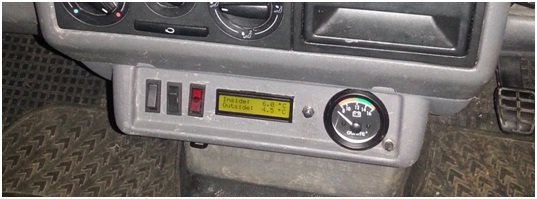
اول، آردوینو یک برد کوچک است که امکان نظارت بر ورودیهای حسگر را در یکی از کانالهای آنالوگ یا دیجیتال متعدد میدهد. واقعاً ساده است، شما فقط کمی کد کوتاه بنویسید تا به آن بگویید چه چیزی را نظارت کند، آن را روی تراشه آپلود کنید و از آنجا خارج شوید. جزئیات بیشتر را در www.arduino.cc بیابید . چندین نسخه وجود دارد. من پروژه خود را بر اساس Uno R3 قرار دادم. در مورد سنسورها، شما می توانید تقریباً هر چیزی را با پنی حس کنید. برای مثال به www.proto-pic.com یا www.oomlout.com نگاهی بیندازید . من در مورد استفاده از Raspberry Pi برای این پروژه فکر کردم، اما زمانی که Arduino را پیدا کردم متوجه شدم RPi بسیار OTT است.
من مستقیماً به نتیجه نهایی میروم - مطمئن هستم که شما علاقهای به دو ماه توسعه، اشکالزدایی، کندن موهایم برای به کار انداختن آن ندارید. مدار نهایی دارای عملکرد زیر است:
• 2 سنسور دما، یکی در داخل ون، دیگری در پشت سپر جلو نصب شده است.
• ولتاژ دو باتری را اندازه می گیرد
• شتاب سنج سه محوره نصب شده در ون را نظارت می کند، که از آن میزان گام را محاسبه می کند. و زاویه رول;
• وضعیت یک دکمه را کنترل می کند که برای نمایش ولتاژ باتری اصلی/آکس، دمای داخل/خارج یا زاویه زیر و بم استفاده می شود
• اگر باتری یا دما خارج از محدوده تنظیم شده باشد، هشدار را نشان می دهد
برای پیاده سازی مدار، مقداری برد مسی از Maplin خریدم و نحوه سیم کشی مدار بالا را به گونه ای که بتوانم مستقیماً به آردوینو وصل کنم، کار کردم. در اینجا یک عکس از مدار تکمیل شده نصب شده روی آردوینو (که در زیر است بنابراین نمی توانید آن را ببینید) را مشاهده می کنید.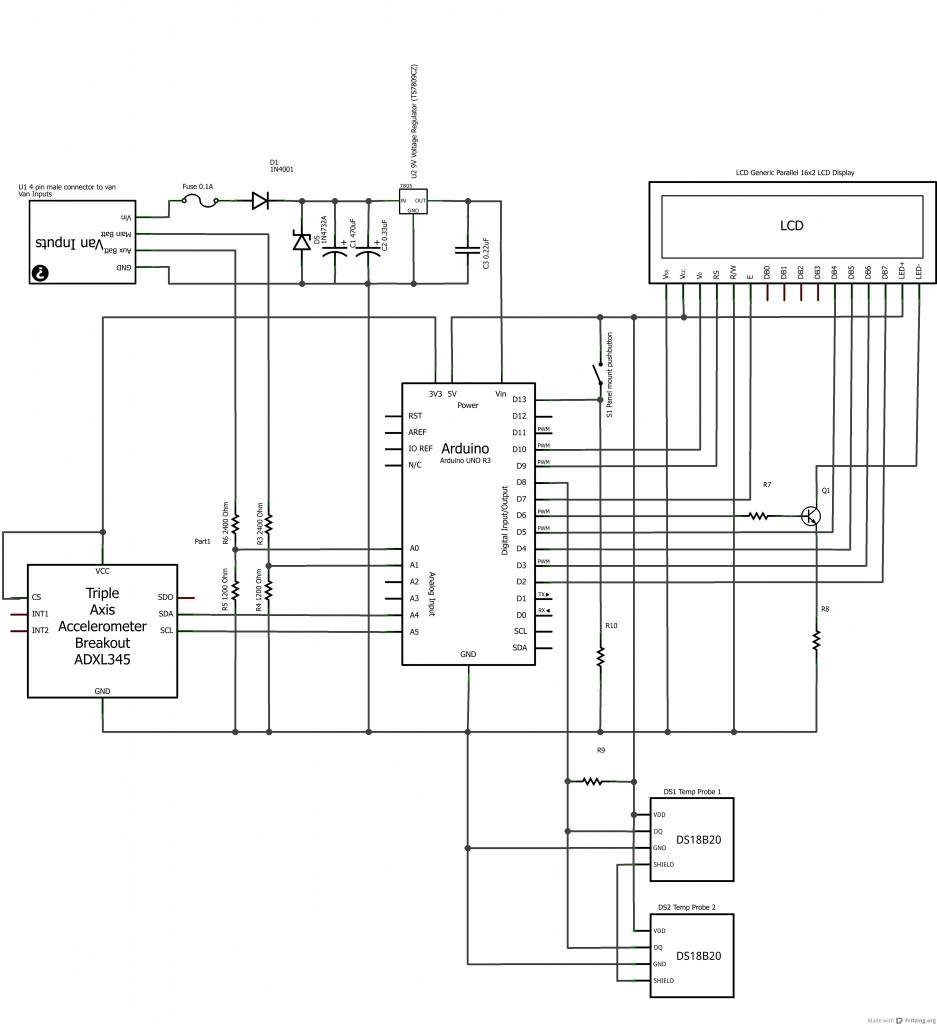
سپس من به سادگی صفحه LCD را همانطور که در تصویر زیر نشان داده شده است نصب کردم (سوئیچ های دیگر روی پانل داخل چراغ ها هستند و DURITE اولین تلاش من برای ولتاژ سنج بود، اما گیج آنالوگ کاملاً بی فایده است). همچنین می توانید دکمه فشاری را در سمت راست صفحه ببینید که کنترل می کند کدام صفحه نمایش داده می شود. در مجموع من از نتیجه بسیار راضی هستم - آردوینو عالی و قابل ارتقا است. من ایده های بیشتری در مورد گنجاندن سنسورهای پارک عقب، هشدار امنیتی و غیره دارم، اما با توجه به اینکه به زودی نوزادی به دنیا می آید، مجبور شدم جاه طلبی های خود را برای مدت زمان محدود کنم. به هر حال، فکر کردم به اشتراک بگذارم، امیدوارم کسی آن را مفید بیابد.
برای جزئیات بیشتر: ولت متر و دما سنج آردوینو
در ادامه، متن انگلیسی این مطلب را میتوانید مشاهده نمایید:
For a while I have been looking for a way of getting a reading of main and leisure battery voltage, and inside and outside temperature in the van. I spent ages on researching and found some bits here and there that might help, but nothing to do the whoe job, and nothing really satisfactory, until finally I found a link to the Arduino website. Never having heard of it before, I did a bit of reading and it seemed perfect. So I set about designing and building the necessary circuitry … below is a brief summary of what I came up with. Before I go on I should tip my hat in this direction – seems like tobes49 thought of it first: http://www.vwt4forum.co.uk/showthread.php?t=198976
First, the Arduino is a small board that allows monitoring of sensor inputs on one of many analogue or digital channels. Its really simple, you just write a short bit of code to tell it what to monitor, upload it to the chip, and away you go. Find more details at www.arduino.cc. There are several versions; I based my project on the Uno R3. As for sensors, you can sense just about anything for pennies. Have a look at www.proto-pic.com or www.oomlout.com for example. I did think about using the Raspberry Pi for this project, but once I found the Arduino I realised the RPi is massively OTT.
I’m going to jump straight to the end result – I’m sure you aren’t interested in the two months of development, debugging, pulling my hair out trying to get it to work. The final circuit has the following functionality:
• 2 temperature sensors, one mounted inside the van, the other behind the front bumper
• Measures the voltages of the two batteries
• Monitors a three-axis accelerometer mounted in the van, from which it calculates pitch and roll angle;
• Monitors the state of a button, used to display either main/aux battery volts, inside/outside temp, or pitch/roll angle
• Displays warning if either battery or temperature is out of set range
To implement the circuit, I bought some copper board from Maplin, and worked out how to wire the above circuit up so that I could attach it directly to the Arduino. Here is a photo of the completed circuit mounted on the Arduino (which is underneath so you cant see it).
Then I simply mounted the LCD screen as shown in the picture below (the other switches on the panel are inside lights, and the DURITE was my first attempt at volt gauge, but analogue gauge is utterly useless); you can also see to the right of the screen the pushbutton that controls which screen is displayed. All in all I am very pleased with the result – the Arduino is awsome and massively expandable. I have more ideas about incorporating rear parking sensors, security alarm etc, but with a baby coming soon I’ve had to cap my ambitions for the timebeing. Anyway, thought I would share, I hope someone finds it useful.
For more detail: Arduino powered voltmeter and temp gauge
