

سه شنبه مبارک، همه! من تمایل دارم در مورد محصولاتی که مبتدیان را قادر می سازد واقعا خلاق باشند هیجان زده می شوم، و برجستگی محصول امروز یکی از مواردی است که فکر می کنم ارزش هیجان را دارد!
چند نکته که من واقعاً در مورد سپر دوست دارم:
شیلد یک برد الحاقی است که برای استفاده با چیپ کیت Uno32، uC32 یا Max 32 طراحی شده است.
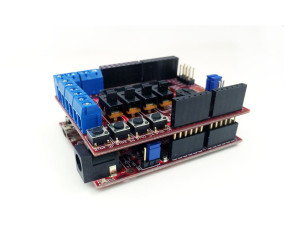
هنگامی که Basic I/O Shield را به برد ChipKIT انتخابی وصل کردید و MPIDE را دانلود کردید (که در ویدیو به آن اشاره شده است)، دنیایی از پروژه ها فوراً در دسترس شما هستند. این به دلیل تمام ویژگی هایی است که در سپر تعبیه شده است.
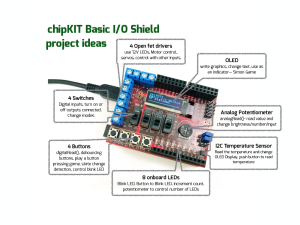
فقط چند ایده پروژه با استفاده از چندین I/O روی سپر. ترکیب آنها باعث ایجاد پروژه های قدرتمندتر می شود!
شاید بهترین بخش در مورد Basic I/O Shield این باشد که شما نیازی به صرف زمان برای سیم کشی تمام اجزای جداگانه ندارید. این برای معلمانی که زمان دوره محدودی دارند عالی است، اگر کارگاهی متمرکز بر برنامهنویسی انجام میدهید، یا اگر میخواهید وقت خود را صرف سیمکشی چیزی غیر سنتی کنید... مانند الایدیهای آنالوگ 12 ولتی (پایان پست را برای نسخه نمایشی ببینید) !
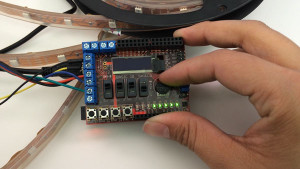
در اینجا چند پروژه وجود دارد که با I/O Shield انجام دادهایم، اما دوست داریم ایدههای پروژه دیگری را ببینیم!
داشتن 8 LED به صورت متوالی (با استفاده از یک آرایه):
/*Arrays

 Demonstrates the use of  an array to hold pin numbers
 in order to iterate over the pins in a sequence.
 Lights multiple LEDs in sequence, then in reverse.

 Unlike the For Loop tutorial, where the pins have to be
 contiguous, here the pins can be in any random order.

 The circuit:
 * on an Arduino and chipKIT uno32 LEDs from pins 2 through 7 to ground
 * on the chipKIT I/O Expander Shield it's pins 26-33

 created 2006
 by David A. Mellis
 modified 5 Jul 2009
 by Tom Igoe  modified by Larissa Swanland Digilent Inc-2014
This example code is in the public domain.

 http://www.arduino.cc/en/Tutorial/Array
 */

int timer = 100;           // The higher the number, the slower the timing.
int ledPins[] = {
  33, 32, 31, 30, 29, 28, 27, 26 };       // an array of pin numbers to which LEDs are
 attached
int pinCount = 8;           // the number of pins (i.e. the length of the array)

void setup() {
  int thisPin;
  // the array elements are numbered from 0 to (pinCount - 1).
  // use a for loop to initialize each pin as an output:
  for (int thisPin = 0; thisPin < pinCount; thisPin++)  {
    pinMode(ledPins[thisPin], OUTPUT);
  }
}

void loop() {
  // loop from the lowest pin to the highest:
  for (int thisPin = 0; thisPin < pinCount; thisPin++) {
    // turn the pin on:
    digitalWrite(ledPins[thisPin], HIGH);
    delay(timer);
    // turn the pin off:
    digitalWrite(ledPins[thisPin], LOW);

  }

  // loop from the highest pin to the lowest:
  for (int thisPin = pinCount - 1; thisPin >= 0; thisPin--) {
    // turn the pin on:
    digitalWrite(ledPins[thisPin], HIGH);
    delay(timer);
    // turn the pin off:
    digitalWrite(ledPins[thisPin], LOW);
  }
}
استفاده از پتانسیومتر آنالوگ برای تغییر تعداد LED:
/*Digilent Inc.
Larissa Swanland 2014
Code written to use with chipKIT Uno32/UC32 + the IO Expander Shield
focus with 10K Potiometer and 8 LED's
to see the pin-outs please look at page 8 in IO Expander reference guide:
https://digilentinc.com/Data/Products/CHIPKIT-BASIC-IO-SHIELD/chipKIT%20Basic%20IO%20Shield
_rm.pdf*/

const int potPin= A0; //Pin that the 10K Pot is attached to

//LED Outputs using an Array, please see Array Code for example
int i;
int led[] = {33, 32, 31, 30, 29, 28, 27, 26 };      // an array of pin numbers to which
 LEDs are attached

//variables that will change:
int potRead= 0;
int potVal= 0;  //Mapped Value of Pot
int lastPot=0; //last value of Pot Stored


void setup(){
  pinMode(potPin, INPUT);  // declare Pot as input
  //intialize the LED pins
  for (int i=0; i < 9; i++){
    pinMode(led[i], OUTPUT);
  }
  Serial.begin(9600);
}

void loop(){
  potRead=analogRead(potPin);            //read Analog Value attached to Pot
  potVal= map(potRead, 0, 1023, 0, 8);   //map the value from 0-1023 to 0-7
 (coincides with LED Array)

                                         //compare old reading to new reading
  if (potVal!= lastPot) {                //if current value is different from old
    lastPot = potVal;                    //then store the new value
    Serial.print(potVal);                //for debugging using Serial monitor
    for (int i=0; i<potVal+1; i++){
      digitalWrite(led[i],HIGH);
    }
  } else {
    for(int i= potVal-1; i>=0; i--){
      digitalWrite(led[i], LOW);
    }
  }

}
نوار آنالوگ RGB:
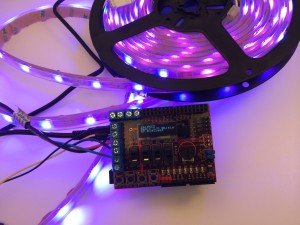
/*Digilent Inc.
Larissa Swanland 2014- Fade colors for RGB Strips
Connect Analog RGB to individual FET channels and power to shared 12V Power Supply
(see photo)*/
#define REDPIN 5
#define GREENPIN 3
#define BLUEPIN 9

#define FADESPEED 5     // make this higher to slow down

void setup() {
  pinMode(REDPIN, OUTPUT);
  pinMode(GREENPIN, OUTPUT);
  pinMode(BLUEPIN, OUTPUT);
}


void loop() {
  int r, g, b;

  // fade from blue to violet
  for (r = 0; r < 256; r++) {
    analogWrite(REDPIN, r);
    delay(FADESPEED);
  }
  // fade from violet to red
  for (b = 255; b > 0; b--) {
    analogWrite(BLUEPIN, b);
    delay(FADESPEED);
  }
  // fade from red to yellow
  for (g = 0; g < 256; g++) {
    analogWrite(GREENPIN, g);
    delay(FADESPEED);
  }
  // fade from yellow to green
  for (r = 255; r > 0; r--) {
    analogWrite(REDPIN, r);
    delay(FADESPEED);
  }
  // fade from green to teal
  for (b = 0; b < 256; b++) {
    analogWrite(BLUEPIN, b);
    delay(FADESPEED);
  }
  // fade from teal to blue
  for (g = 255; g > 0; g--) {
    analogWrite(GREENPIN, g);
    delay(FADESPEED);
  }
}
ترکیب سوئیچ ها + پتانسیومتر + نوارهای RGB آنالوگ:
/*Digilent Inc
Larissa Swanland 2014
S4- is the on-off switch
S1-3 are the switches that control the channel on the RGB LEDs
The Analog Pot will control brightness*/

const int potPin= A0; //Pin that the 10K Pot is attached to
const int red = 5; // Pin 3 when LED Strip is connected
const int blue= 3; // Pin 5 when LED Strip is connected
const int green= 9; // Pin 6 When LED Strip is connected
const int sw1= 35;
const int sw2= 8;
const int sw3= 7;
const int sw4= 2;

int s1,s2,s3,s4;
int potRead= 0;
int potVal=0;  //Mapped Value of Pot-- intensity
int lastPot=0; //last value of Pot Stored

void setup(){
  pinMode(sw1, INPUT);
  pinMode(sw2, INPUT);
  pinMode(sw3, INPUT);
  pinMode(sw4, INPUT);

  pinMode(potPin, INPUT);  // declare Pot as input

  pinMode(red, OUTPUT);
  pinMode(blue, OUTPUT);
  pinMode(green, OUTPUT);

  Serial.begin(9600);
}

void loop(){
  //read the switch values
  s1= digitalRead(sw1); //red
  s2= digitalRead(sw2); //green
  s3= digitalRead(sw3); //blue
  s4= digitalRead(sw4); //on or off
  potRead=analogRead(potPin); //read Analog Value attached to Pot
  potVal=map(potRead, 0, 1023, 0, 256); //map the pot to the value of RGB Brightness

   if(potVal!=lastPot){
   lastPot= potVal;
   Serial.print(potVal);}

  if(s4==0)// the last switch is on
 {
  analogWrite(red, 0);
  analogWrite(green,0);
  analogWrite(blue, 0);
 }else{
   analogWrite(red, s1*potVal);
   analogWrite(green,s2*potVal);
   analogWrite(blue,s3*potVal);
 }
  Combine all of the sketches together!
}
/*Digilent Inc
Larissa Swanland 2014
S4- will make the LEDs cycle through a routine (there is a slight delay)
S1-3 are the switches that control the channel on the RGB LEDs
The Analog Pot will speed of the cycle*/

const int potPin= A0; //Pin that the 10K Pot is attached to
const int red = 5; // Pin 3 when LED Strip is connected
const int blue= 3; // Pin 5 when LED Strip is connected
const int green= 9; // Pin 6 When LED Strip is connected
const int sw1= 35;
const int sw2= 8;
const int sw3= 7;
const int sw4= 2;

int s1,s2,s3,s4;
int potRead= 0;
int potVal=0; //Mapped Value of Pot-- intensity
int lastPot=0; //last value of Pot Stored
int fadespeed=1; //fadespeed

void setup(){
pinMode(sw1, INPUT);
pinMode(sw2, INPUT);
pinMode(sw3, INPUT);
pinMode(sw4, INPUT);

pinMode(potPin, INPUT); // declare Pot as input

pinMode(red, OUTPUT);
pinMode(blue, OUTPUT);
pinMode(green, OUTPUT);

Serial.begin(9600);
}

void loop(){

//read the switch values
s1= digitalRead(sw1); //red
s2= digitalRead(sw2); //green
s3= digitalRead(sw3); //blue
s4= digitalRead(sw4); //on or off
potRead=analogRead(potPin); //read Analog Value attached to Pot
potVal=map(potRead, 0, 1023, 0, 256); //map the pot to the value of RGB Brightness

while(potVal!=lastPot){
lastPot= potVal;
Serial.print(potVal);
}
if (s4==1)// the last switch is on
{

fade();

}else{
analogWrite(red, s1*potVal);
analogWrite(green,s2*potVal);
analogWrite(blue,s3*potVal);
}
}

void fade(){
int r, g, b;
fadespeed= 255/potVal;

// fade from blue to violet
for (r = 0; r < 256; r++) { analogWrite(red, r); delay(fadespeed); } // fade from violet
 to red for (b = 255; b > 0; b--) {
analogWrite(blue, b);
delay(fadespeed);
}
// fade from red to yellow
for (g = 0; g < 256; g++) { analogWrite(green, g); delay(fadespeed); } // fade from yellow
to green for (r = 255; r > 0; r--) {
analogWrite(red, r);
delay(fadespeed);
}
// fade from green to teal
for (b = 0; b < 256; b++) { analogWrite(blue, b); delay(fadespeed); } // fade from teal to
blue for (g = 255; g > 0; g--) {
analogWrite(green, g);
delay(fadespeed);
}
}
در ادامه، متن انگلیسی این مطلب را میتوانید مشاهده نمایید:
Happy Tuesday, everyone! I tend to get excited about products that enable beginners to be really creative, and today’s product highlight is one I think is worth getting excited about!
A few things that I really like about the shield:
