

سنسور فاصله مادون قرمز (IR) سنسوری است که می تواند فاصله از یک جسم جامد یا فیزیکی را اندازه گیری کند.
یک سنسور فاصله مادون قرمز این کار را از طریق امواج نور انجام می دهد.
نور مادون قرمز را می فرستد و منتظر می ماند تا آن را در انتهای گیرنده دریافت کند. اگر نور مادون قرمز را پس بگیرد، به این معنی است که امواج نور از یک جسم فیزیکی منعکس شده و به حسگر بازگشته است. اگر امواج نور را به عقب دریافت نکند، به این معنی است که هیچ جسم فیزیکی در مقابل آن در زاویه دید وجود ندارد.
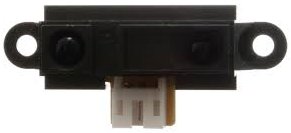
سنسور مادون قرمزی که ما استفاده خواهیم کرد سنسور فاصله مادون قرمز شارپ GP2Y0A21 است.
ما کدی می نویسیم تا اگر حسگر جسمی را در چند اینچ از آن تشخیص دهد، روشن می شود و یک LED روشن می شود.
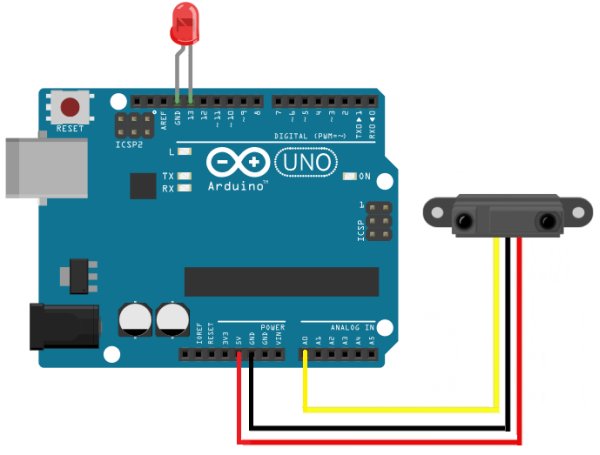
این یک LED خروجی آنالوگ است، بنابراین ما این سنسور را به یک میکروکنترلر آردوینو وصل می کنیم تا خروجی آنالوگ را بخوانیم. بنابراین، ما برای ساخت این مدار سنسور فاصله مادون قرمز، سنسور را به میکروکنترلر آردوینو متصل می کنیم.
اجزاء
- سنسور فاصله مادون قرمز GP2Y0A21
- رهبری
- آردوینو
سنسور فاصله اولتراسونیک شارپ GP2Y0A21 نسبتا ارزان است. می توان آن را با کمی بیش از 6 دلار در ebay دریافت کرد.
این دستگاه از 4.5 ولت تا 5.5 ولت DC کار می کند، بنابراین ترمینال 5 ولتی که آردوینو دارد برای تأمین انرژی این سنسور مادون قرمز عالی است.
سنسور معمولاً با جریان 30 میلی آمپر کار می کند. بنابراین از حدود 150 میلی وات (30 میلی آمپر x 5 ولت = 150 میلی وات) استفاده می کند.
زمان پاسخگویی بسیار سریع 30 میلی ثانیه (10±) دارد.
برگه اطلاعات سنسور را می توانید در لینک زیر پیدا کنید: GP2Y0A21 سنسور فاصله مادون قرمز Datasheet .
سنسور در مجموع 3 پین دارد. 2 پایه پاور و 1 خروجی سیگنال آنالوگ است.
پین اوت HC-SR04 در زیر نشان داده شده است.
پایه های پاور سیم قرمز است که +5 ولت است و سیم مشکی که زمین است. V CC و GND. بنابراین سیم قرمز به V CC متصل می شود . GND به زمین متصل است.
سیم زرد (سیگنال) سیمی است که حاوی سیگنال خروجی آنالوگ است. این یک ولتاژ روی سیم سیگنال است که آردوینو می خواند و به مقدار آنالوگ از 0 تا 1023 تبدیل می کند. وقتی سنسور یک شی را در فاصله 80 سانتی متری تشخیص می دهد (دورترین فاصله ای که می تواند تشخیص دهد)، سیگنال ولتاژ خروجی حدود 0.4 ولت است. هنگامی که سنسور یک شی را در فاصله 10 سانتی متری تشخیص می دهد (نزدیک ترین چیزی که می تواند تشخیص دهد)، ولتاژ خروجی معمولاً 2.3 ولت است. بنابراین بین نزدیکترین و دورترین فاصله ای که سنسور مادون قرمز می تواند تشخیص دهد 1.9 ولت تفاوت وجود دارد. این ولتاژ، دوباره، مستقیماً با مقدار آنالوگی که آردوینو تولید خواهد کرد، متناسب است.
بنابراین اگر سنسور هیچ جسمی را تشخیص ندهد، ولتاژ خروجی و قرائت آنالوگ تقریباً 0 خواهد بود (هیچ شی شناسایی نشده است). با این حال، اگر یک جسم شناسایی شود، ولتاژ و قرائت آنالوگ بالای 0 خواهد بود. ولتاژ خروجی از 0.4 ولت تا 2.3 ولت خواهد بود. و خواندن آنالوگ از 1 تا 1023 خواهد بود.
مدار سنسور فاصله مادون قرمز (IR).
مدار سنسور فاصله اولتراسونیک که برای اندازه گیری فاصله از جسم شناسایی شده استفاده می کنیم در زیر نشان داده شده است.
برای جزئیات بیشتر: چگونه یک مدار حسگر فاصله مادون قرمز بسازیم
در ادامه، متن انگلیسی این مطلب را میتوانید مشاهده نمایید:
An infrared (IR) distance sensor is a sensor that can measure distance from a solid or physical object.
An infrared distance sensor does this through light waves.
It sends out infrared light and waits to receive it back at the receiver end. If it receives back the infrared light, this means that the light waves have bounced off of a physical object and has returned back to the sensor. If it does not receive the light waves back, then this means there is no physical object in front of it within viewing angle.
The infrared sensor we will use is the Sharp GP2Y0A21 Infrared Distance Sensor.
We will write code so that if the sensor detects an object that is within a few inches of it, it will turn on and light up an LED.
This is an analog output LED, so we will connect this sensor to an arduino microcontroller in order to read the analog output. Therefore, we will connect the sensor to an Arduino microcontroller to build this infrared distance sensor circuit.
Components
- GP2Y0A21 Infrared Distance Sensor
- LED
- Arduino
The Sharp GP2Y0A21 Ultrasonic Distance Sensor is relatively cheap. It can be gotten for a little over $6 on ebay.
It runs on anywhere from 4.5V- 5.5V of DC power, so the 5V terminal that the arduino has is perfect for powering this infrared sensor.
The sensor typically runs on 30mA of current. So it uses about 150mW (30mA x 5V= 150mW).
It has a pretty quick response time of 30ms (±10).
The datasheet of the sensor can be found at the following link: GP2Y0A21 Infrared Distance Sensor Datasheet.
The sensor has 3 pins in total. 2 are power pins and 1 is the analog signal output.
The pinout for the HC-SR04 is shown below.
The power pins are the red wire, which is +5V, and the black wire, which is ground. VCC and GND. So the red wire is connected to VCC. GND is connected to ground.
The yellow wire (signal) is the wire that contains the analog output signal. This is a voltage on the signal wire that the arduino reads and converts to an analog value ranging from 0 to 1023. When the sensor detects an object 80cm away (farthest it can detect), the output voltage signal is about 0.4V. When the sensor detects an object 10cm away (the closest it can detect), the output voltage is typically 2.3V. So there is a difference of 1.9V between the closest and farthest the infrared sensor can detect. This voltage, again, is directly proportional to the analog value that the arduino will produce.
So if the sensor detects no object, the output voltage and analog reading will be pretty much 0 (no object detected). However, if an object is detected, the voltage and analog reading will be above 0. The output voltage will be be anywhere from 0.4V to 2.3V. And the analog reading will be anywhere from 1 to 1023.
Infrared (IR) Distance Sensor Circuit
The Ultrasonic Distance Sensor Circuit we will use to measure distance from the object detected is shown below.
For more detail: How to Build an Infrared Distance Sensor Circuit
