

در این پروژه مدار گیج سطح مایع را با آردوینو می سازیم.
این مداری است که در آن می توان سطح مایع را از طریق یک گیج کنترل کرد.
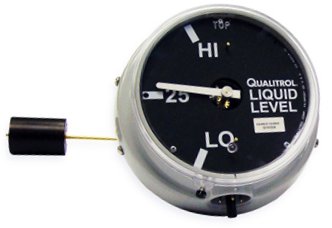
همانطور که در بالا می بینید، سطح مایع را از روی گیج می خوانیم (کم، متوسط یا زیاد).
با یک میکروکنترلر مانند آردوینو، ساخت این مدار یک شاهکار بسیار ساده است.
میکروکنترلر می تواند ولتاژ آنالوگ را از سنسور سطح مایع بخواند و سپس بر اساس آن مقدار، سیگنال آنالوگ متناسبی را به متر ارسال کنیم تا سطح مایع تعیین شده توسط سنسور را به ما نشان دهد.
سطوح مایع می تواند کاربردهای متعددی داشته باشد، برای هر زمان که هر نوع مایعی نیاز به اندازه گیری و/یا نظارت داشته باشد.
اجزای مورد نیاز
- آردوینو
- سنسور سطح مایع
- متر آنالوگ
سنسور سطح مایع مورد استفاده ما توسط China Harbin Okumatsu Robot Technology Co ساخته شده است و محصول آن RB-02S048 است. این قسمت را می توان به راحتی در ebay برای اکثر اوقات زیر 2 دلار از جمله حمل و نقل به دست آورد. بسیار ارزان است.
سنسور یک سنسور آنالوگ است، به این معنی که ولتاژ آنالوگ را متناسب با مقدار مایعی که در معرض آن قرار می گیرد، خروجی می دهد. سنسور دارای یک سری سیم های موازی در سراسر برد است. این سیمها سطح مایعی را که برد در معرض آن قرار دارد، حس میکنند. ما به سادگی پین آنالوگ را که با یک S نشان داده می شود، به یک پایه آنالوگ روی برد آردوینو وصل می کنیم تا مقدار آنالوگ را بخوانیم.
سنسور با ولتاژ 5 ولت کار می کند و برای جریان برق کارکرد به کمتر از 20 میلی آمپر نیاز دارد، به این معنی که آردوینو به راحتی می تواند آن را تامین کند (بنابراین برای تغذیه آن نیازی به برق خارجی نیست).
سنسور سطح مایع دارای 3 پین است. خیلی ابتدایی است. پین اوت در زیر نشان داده شده است.
2 تا از پایه ها برای برق هستند، یکی به +5 ولت آردوینو و دیگری به ترمینال زمین آردوینو وصل می شود. پایه دیگر، با S، پایه سیگنال است. این پین است که سیگنال ولتاژ آنالوگ را متناسب با مقدار سنسوری که با مایع پوشانده شده است، خروجی می دهد. این پین به یک پایه آنالوگ روی برد آردوینو متصل می شود تا خوانده شود.
پانل متر آنالوگ که ما استفاده خواهیم کرد را می توان در Sparkfun در اینجا یافت: آنالوگ پانل متر . پنل دارای نمایشگر ولتاژ است، زیرا به عنوان یک ولت متر در نظر گرفته شده است. اما کاملاً منحرف میشود، گویی یک پنلسنج برای سنسور سطح مایع است. دلیل اینکه میگویم با این پنل بروید این است که واقعاً یک پانل خاص برای سنسورهای سطح مایع پیدا نخواهید کرد، مگر اینکه خودتان بسازید یا آن را سفارشی سفارش دهید، که ممکن است افراطی باشد. بنابراین، شما فقط می توانید از پانل متر ارائه شده توسط Sparkfun استفاده کنید. اما اگر واقعاً جدی هستید، می توانید نگاه کنید. این می تواند از 0 ولت تا 5 ولت ولتاژ DC را با دقت 2.5 درصد اندازه گیری کند. نسبتا دقیق است. هنگامی که با منبع تغذیه DC آزمایش شد، ولتاژهای DC مربوطه تقریباً با آنچه که باید باشد مرده بودند.
مدار گیج سطح مایع آردوینو
نمودار شماتیک مدار سنج سطح مایع آردوینو در زیر نشان داده شده است.

برای جزئیات بیشتر: نحوه ساخت مدار گیج سطح مایع با آردوینو
در ادامه، متن انگلیسی این مطلب را میتوانید مشاهده نمایید:
In this project, we will build a liquid level gauge circuit with an arduino.
This is a circuit in which a liquid level can be monitored through a gauge.
We read the liquid level from the gauge (low, medium, or high), just as you see above.
With a microcontroller such as the arduino, building this circuit is a pretty simple feat.
The microcontroller can read the analog voltage from the liquid level sensor and then based on that value, we can send a proportional analog signal to the meter so that it can display to us the liquid level determined by the sensor.
Liquid levels can numerous applications, for whenever any type of liquids need to be measured and/or monitored.
Components Needed
- Arduino
- Liquid Level Sensor
- Analog Meter
The liquid level sensor we will use is built by China Harbin Okumatsu Robot Technology Co and its product item is RB-02S048. This part can easily be obtained on ebay for most of the time under $2 including shipping. It’s very inexpensive.
The sensor is an analog sensor, meaning it outputs an analog voltage in proportion to the amount of liquid it is exposed to. The sensor has a series of parallel wires across the board. These wires are what sense the liquid level that the board is exposed to. We simply connect the analog pin, represented by an S, to an analog pin on the arduino board to read the analog value.
The sensor operates on 5V and needs less than 20mA for operating power current, which means the arduino can easily provide this (so no external power is needed to power it).
The liquid level sensor has 3 pins. It’s very basic. The pinout is shown below.
2 of the pins are for power, 1 connecting to the +5V of the arduino and the other connecting to the ground terminal of the arduino. The other pin, with an S, is the signal pin. This is the pin that outputs the analog voltage signal in proportion to the amount of the sensor which is covered with liquid. This pin connects to an analog pin on the arduino board to be read.
The analog panel meter we will use can be found at Sparkfun here: Analog Panel Meter. The panel has a voltage display, as it is meant to be a voltmeter. But it will deflect perfectly fine, as if it were a panel meter for a liquid level sensor.The reason I say to go with this panel is you won’t really find a specific panel for liquid level sensors, unless you build your own or have it custom ordered, which may be extreme. Therefore, you can just use the panel meter provided by Sparkfun. But if you’re really serious, you can look. This can measure from 0V to 5V of DC voltage with 2.5% accuracy. It’s fairly accurate. When tested with a DC power supply, the corresponding DC voltages were pretty much dead-on with what it should be.
Arduino Liquid Level Gauge Circuit
The schematic diagram of the arduino liquid level gauge circuit is shown below.
For more detail: How to Build a Liquid Level Gauge Circuit with an Arduino
